widgetExternalContent is a widget that allows you to insert both javascript scripts and HTML code using the CKEditor.
This feature differentiates it from most other types of widgets.
For example, the ExternalContent widget could be used to create small HTML graphical interfaces to which javascript functions are associated.
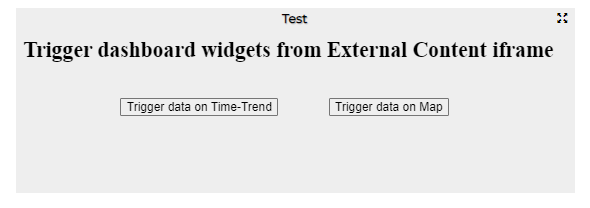
Figure: widgetExternalContent example
In the following example it is in fact possible to define an iframe with two buttons that send data to two different widgets, a time trend and a widget map.
The HTML code and the JS function to be inserted in the appropriate box (in more options) of the current widget is of the following type:
<html>
<head>
<script src="https://ajax.googleapis.com/ajax/libs/jquery/1.10.1/jquery.min.js"></script>
<script type='text/javascript'>
var showAlert;
var triggerTimeTrend;
var triggerMap;
$(document).ready(function () {
showAlert = function () {
var myText = "Test alert";
alert (myText);
}
$('#triggerTTrend').click(function (event) {
parent.$('body').trigger({
type: "showTimeTrendFromExternalContentGis_<TARGET_WIDGET_NAME>",
eventGenerator: $(this),
targetWidget: "<TARGET_WIDGET_NAME>",
range: "7/DAY",
color1: "#34eb6e",
color2: "#114a23",
widgetTitle: "Free Parking Lots data from External Content",
field: "freeParkingLots",
serviceUri: "<SERVICE_URI>",
marker: "",
mapRef: "",
fake: false
});
});
$('#triggerMap').click(function (event) {
let coordsAndType = {};
coordsAndType.eventGenerator = $(this);
coordsAndType.desc = "CarPark";
coordsAndType.query = "<SERVICE_URI>";
coordsAndType.color1 = "#ebb113";
coordsAndType.color2 = "#eb8a13";
coordsAndType.targets = "w_DISIT_orionUNIFI_<TARGET_WIDGET_NAME>";
coordsAndType.display = "pins";
coordsAndType.queryType = "Default";
coordsAndType.iconTextMode = "text";
coordsAndType.pinattr = "square";
coordsAndType.pincolor = "#959595";
coordsAndType.symbolcolor = "undefined";
coordsAndType.bubbleSelectedMetric = "";
parent.$('body').trigger({
type: "addSelectorPin",
target: "<TARGET_WIDGET_NAME>",
passedData: coordsAndType
});
});
});
</script>
</head>
<body>
<h2>Trigger dashboard widgets from External Content iframe</h2>
<div>
<button id="triggerTTrend">Trigger data on Time-Trend</button>
<button id="triggerMap">Trigger data on Map</button>
</div>
</body>
</html>
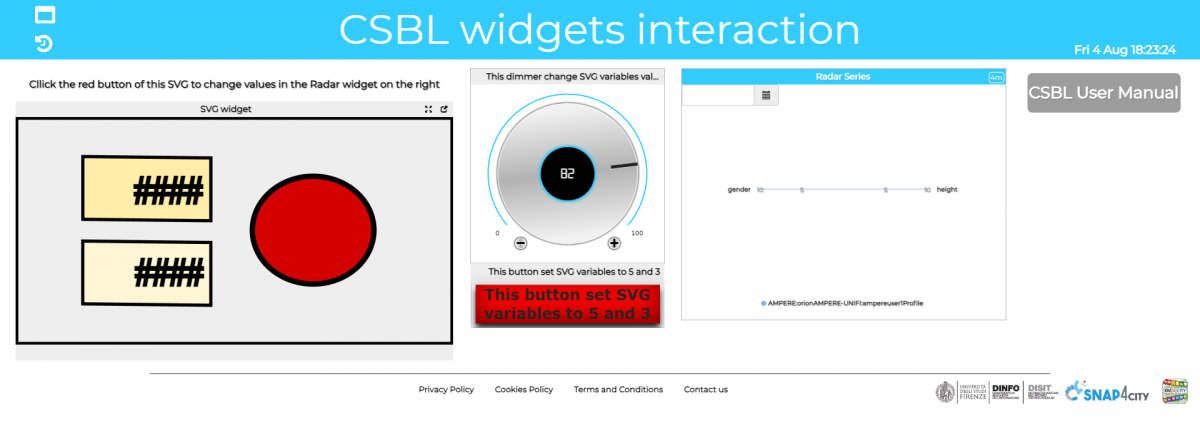
5.14.1 Use of Synoptics SVG in ExternalContent Widget
The External Content widget allows the loading of custom widgets in SVG format. They can be used with SSBL and CSBL. For general design, develop and test SVG synoptics see:
- TC1.22a: Create and configure a Snap4City SVG Custom Widget for real-time interaction
- TC1.22b: Create and configure a Snap4City SVG Custom Widget for real-time interaction
- Custom Widgets: Table explanation, as SVG
- TC1.26: Use customised SVG pins in a map
- Custom Synoptics and Widgets for Dashboards
This section describes how to use SVG on web pages directly without using them from server side business logic.
During the creation of an External content widget in the Widget link field is possible to link the url of a previously created CustomWidget or Synoptic.

To allow the embedding of the screen svg code in the html code of the widget it is necessary to activate as true the menu "SVG Mode" and "Enable CKEditor" in the lower right section of the widget modification form.
6.14.1.1 widgetExternalContent as Writing widget: From Svg to Dashboard Widget.
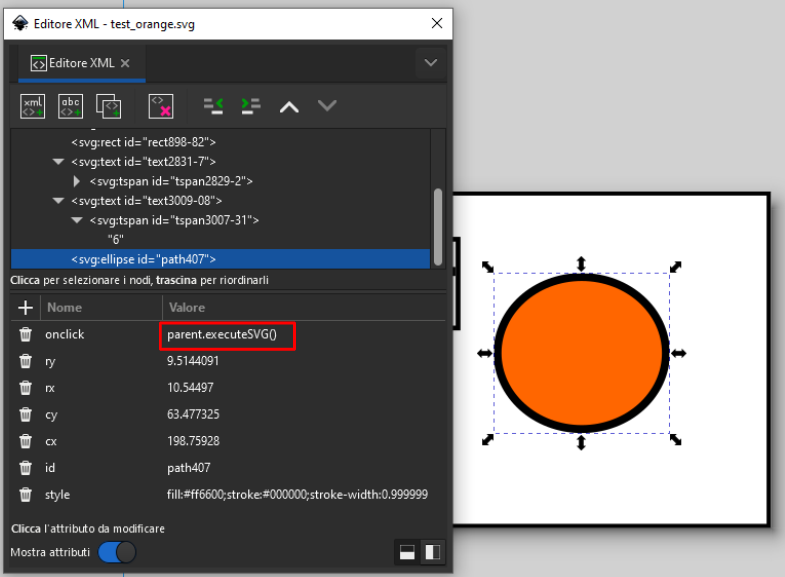
A javascript function can be defined in the CKeditor area of the widgetExternalContent and executed by the SVG synoptic.
In this example, clicking on an element of the synoptic svg it is possible to send parameters to a radar widget.
function executeSVG() {
$('body').trigger({
type: "showRadarSeriesFromExternalContent_<TARGET WIDGET NAME>",
eventGenerator: $(this),
targetWidget: <TARGET WIDGET NAME>,
range: "7/DAY",
color1: "#9b93ed",
color2: "#231d5c",
events: "sendData",
passedData: [{"metricId":"https://servicemap.disit.org/WebAppGrafo/api/v1/?serviceUri=http://www.disit.org/km4city/resource/iot/orionUNIFI/DISIT/I...","metricHighLevelType":"Sensor","metricName":"DISIT:orionUNIFI:IT0957A1","metricType":"O3_"}]
});
}
The function, which in this case is called executeSVG(), must be present in the svg synoptic and be called as "parent.executeSVG()".
6.14.1.2 widgetExternalContent as Reading widget: From Dashboard Widget to Svg
The Svg synoptic embedded in the widgetExternal content can receive some parameters from another widget and use them.
These parameters have to be written in a specific array of objects with the following keys:
{
“target”: <id of element in svg file>
“attributes”: <element with data-siow parameters of the object>
}
The following is an example of a selected text into a svg XML with a defined data-siow attribute defining the variable “ispravar6” that can be governed in the Client Side as explained below. Please refer to the following webpages for more information about hot to define a data-siow attribute in an SVG:
- TC1.22a: Create and configure a Snap4City SVG Custom Widget for real-time interaction
- TC1.22b: Create and configure a Snap4City SVG Custom Widget for real-time interaction
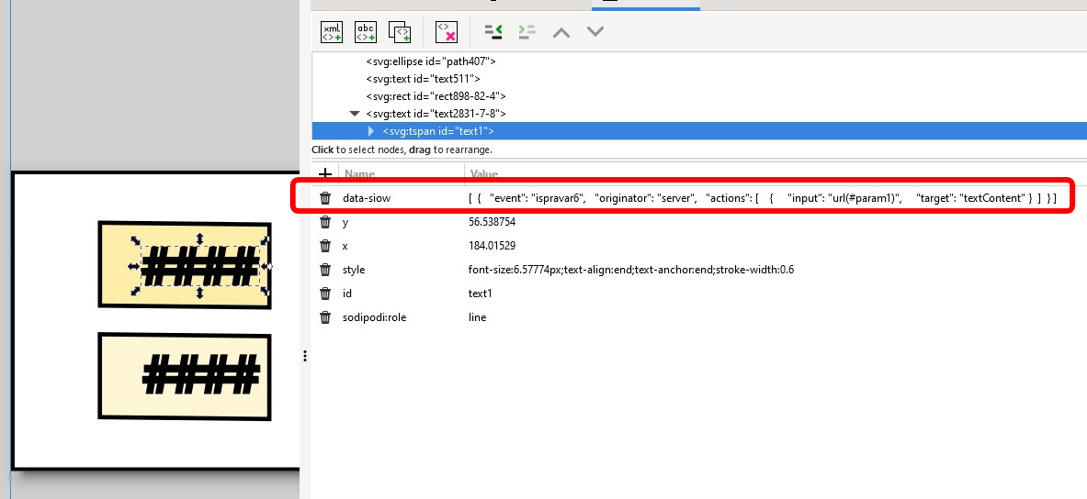
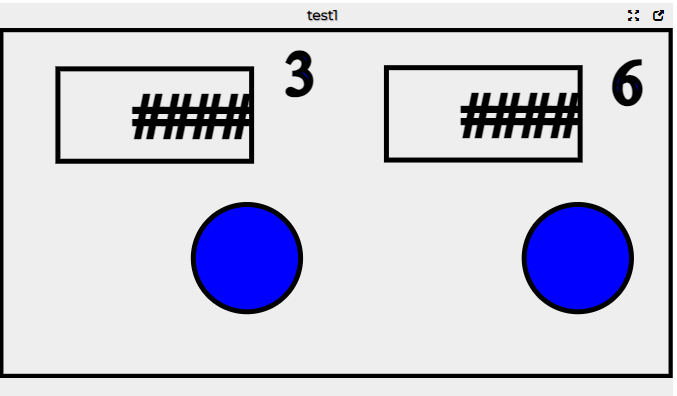
In the following example we want to send input values to two text elements present in the synoptic svg which have "text1" and "text2" as identifiers by using a widgetImpulseButton that will contains the client logic to send these parameters.
The structure of the function in the widgetImpulseButton is no different from other trigger functions:
function execute() {
let svg_data = [{
"target": "text1",
"attributes": [{
"event": "ispravar6",
"originator": "server",
"actions": [{
"input": "5",
"target": "textContent"
}]
}]}, {
"target": "text2",
"attributes": [{
"event": "ispravar6",
"originator": "server",
"actions": [{
"input": "3",
"target": "textContent"
}]
}]
}];
$('body').trigger({
type: "showExternalContentFromExternalContent_<TARGET WIDGET NAME>",
eventGenerator: $(this),
targetWidget: <TARGET WIDGET NAME>,
range: "7/DAY",
color1: "#9b93ed",
color2: "#231d5c",
events: "sendData",
passedData: {
"dataOperation": svg_data
}
});
}
A public example of dashboard with this interaction is available at the following link: https://www.snap4city.org/dashboardSmartCity/view/index.php?iddasboard=MzgyOQ==
6.14.2 widgetExternalContent to define data template
The External Content widget allows you to receive input values, for example a serviceUri, and use them to display data according to a precise template defined in the external content CKEditor.
To send data from an input widget, such as a widgetButton or a widgetMap, the "events" parameter must be setted as "sendcontent". To define an example of input request to send to widgetExaternalContent
function execute() {
const myJSONObject = {
serviceuri: '<SERVICE_URI>',
type: 'floor'
};
const jsonString = JSON.stringify(myJSONObject);
$('body').trigger({
type: 'showExternalContentFromExternalContent_<TARGET_WIDGET_NAME>',
eventGenerator: $(this),
targetWidget: '<TARGET_WIDGET_NAME>',
range: '7/DAY',
events: 'sendContent',
passedData: jsonString
})
};
This example shows an HTML and Javascript script to be inserted in the CKEditor menu of the ExternalContent widget which is associated with an 'action' function which processes the data received as input and uses them.
This script receives a serviceuri as input by a widgetmap clicking on the marker on the map, and in the action function processes it through an ajax request to extract a value and subsequently display it in the output of the external content widget as an HTML content filled by values.
<!DOCTYPE html>
<html>
<head>
<script src="https://ajax.googleapis.com/ajax/libs/jquery/1.10.1/jquery.min.js"></script>
</head>
<body>
<div id="messageBox" style="width: 100%; height: 100px; background-color: #FFD700; display: flex; justify-content: center; align-items: center; font-size: 18px;"> no message </div>
<script>
function action(paramString) {
var param = JSON.parse(paramString);
$.ajax({
url: "https://www.snap4city.org/dashboardSmartCity/controllers/superservicemapProxy.php/api/v1/?serviceUri="+ param.serviceuri + "&format=json",
type: "GET",
data: {},
async: true,
dataType: 'json',
success: function(data) {
if (data) {
<SCRIPT TO DEFINE HOW TO VIEW DATA>
} else {
console.log("Error in ASCAPI Data Retrieval.");
}
},
error: function(data) {
console.log(JSON.stringify(data));
}
});
}
</script>
</body>
</html>
To allow the reading of the trigger received as input, a function called action has to be defined in this code.
The HTML content to view the values is fully customizable by the client, the client for example could define some templates to show the value in different ways on the base of some typology or amounts of values.