Download the mobile application from Snap4all mobile app as APK for ANDROID with NODE-RED: 2022 version, all Snap4City feature in your hands:
- APK download: https://www.snap4city.org/download/video/Snap4All-v1.0.5-large.apk
- PDF version of this page: Technical Manual https://www.snap4city.org/drupal/sites/default/files/files/Snap4All-TechnicalManual-2022.pdf
Snap4All Mobile App, Node-RED for Android phones
technical Manual (refer to Snap4City@disit.org) 2022 November
1 Introduction
For each chapter that requires it, blocks of code will be proposed as an example of the work described in the same. Each resource used will be included as a footnote corresponding to its use. The previous application was developed in 2018 by Steven Salazar1, whose report we attach here 2. This version has been developed by Alberto Del Buono Paolini -Federico Marra with the support of DISIT lab, Snap4City team and experts.
2 Adaptation to the new Termux version
To solve the first and most important problem, we had to completely update the application starting from a fork of the latest version of Termux, available on GitHub3. As a Termux fork we also inherited 4 their GPLv3 license for the application and the Apache 2.0 licenses for the terminal-view and terminalemulator subpackages.
2.1 Merge between updated Termux and old Snap4All ap
plication
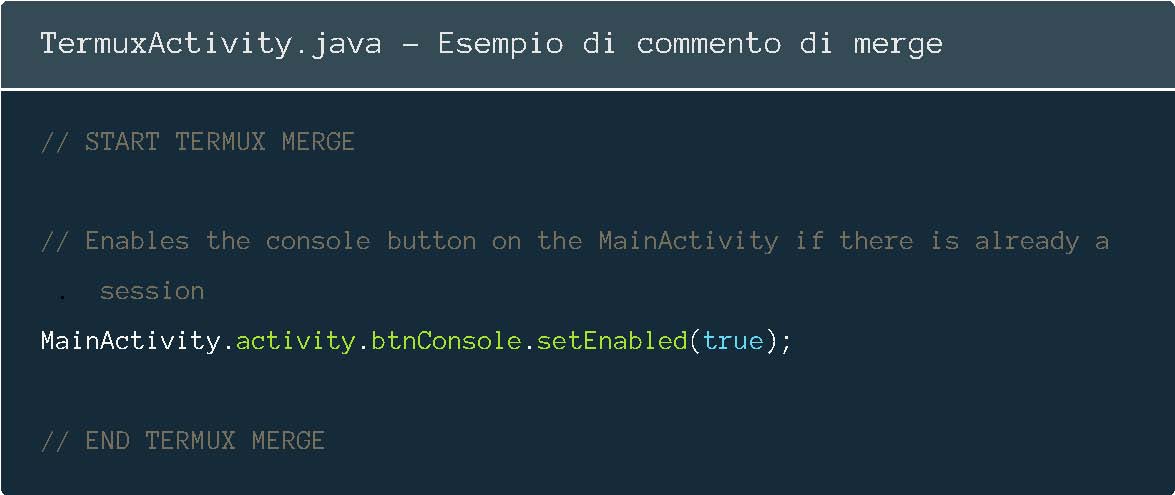
We have reported all the code snippets reported with the TERMUX MERGE comment from the previous codebase to the new fork 5 just created. Unfortunately this was not enough since not all code changes of original Termux had been reported with that comment. Moreover, some modified files were no longer present in the same form since the code or Termux had been updated. Now all changes to the original Termux repository are marked with TERMUX MERGE and easily traceable by searching for MERGE across the codebase.
1 https://github.com/StevenSalazarM 2https://github.com/albbus-stack/snap4all/blob/master/old-relation/
3https://github.com/termux/termux-app
4https://github.com/termux/termux-app/blob/master/LICENSE.md
5 https://github.com/albbus-stack/snap4all
2.2 Updating termux-api-package
Clearly, the subpackage of Termux responsible for interactions with the Android system, i.e. termux-api-package, had also been updated very frequently in the recent years. We have therefore made a fork 6 of this package, including also the changes necessary for the operation of the custom commands termux-enable-buttons, termux-bluetooth-scaninfo and termuxbluetooth-connect. The latter call the corresponding Java functions localized in the termux-api module that implement their functionality.
![]()
#!/data/data/com.termux/files/usr/bin/sh
set -e -u
SCRIPTNAME=termux-enable-buttons
show_usage () { echo "Usage: \$SCRIPTNAME" echo "Enables the node-red button." exit 0
} ... /data/data/com.termux/files/usr/libexec/termux-api EnableButtons
6https://github.com/albbus-stack/snap4all-termux-api-package
2.3 Updating bootstrap packages
In the previous version of Snap4All, bootstrap packages, i.e. compressed archives that contain the Termux filesystem, were downloaded from an external server when the application was built. This method is not only slow but also precludes the modification of such archives, being served by a public server.
We opted to host them on Github and then always use the same archives locally at buildtime. This mode allows us to generate bootstrap archives with any apt package we need, and then upload them to Github, thanks to the generate-bootstrap.sh7script. This script is part of the termux-packages 8 repository and together with run-docker.sh allows us to consistently generate bootstrap archives for each architecture. In our case it was necessary to install various packages:
- git: used to download the termux-api-package fork from Github.
- make, cmake, clang: used to install termux-api-package.
- node-js: used to install node-red.
- coreutils, openssh, nano: basic tools for a Unix system, including the
nano text editor for convenience in editing system files from the console. Our use of the two termux-packages scripts follows:
![]() shell > ./run-docker.sh > ./generate-bootstrap.sh -a git, make, cmake, clang, coreutils, nano, nodejs, openssh
shell > ./run-docker.sh > ./generate-bootstrap.sh -a git, make, cmake, clang, coreutils, nano, nodejs, openssh
2.4 node-red-contrib-termux-api fork
Several errors occurred while testing the application, including one related to node-red-contrib-termux-apipackage. This error occurred using the Camera Photo node and was due to the incorrect call of the fs.unlink function,
7 https://github.com/termux/termux-packages/blob/master/scripts/ generate-bootstraps.sh
8https://github.com/termux/termux-packages
whose task is to delete the temporary photo that was taken by the Termux api. We then made a fork 9 of that package by changing the call to unlink, adding as a second argument a callback that runs at the end of this function. Checking the other nodes of this package, we did not find any other function that had a deprecated signature.

2.5 Code cleanup and documentation
Installation script (TermuxService part) We modified the installation script to be readable in the future, it was split into clearly distinct parts, making it more easily extensible. In addition, the external resources needed to install the forks discussed above and insert the sample Node-RED flows are all found from the respective Github repositories, making updating them much easier and more modular.
![]()

9https://github.com/albbus-stack/node-red-contrib-termux-api
// Acquire wakelock
"termux-wake-lock\n"+
// Npm executable setup for termux
"[ -f "+isInstalled+" ] || chmod +x "+PREFIX_PATH+"/bin/npm\n"+
// Installs a custom termux-api package
"[ -d "+apiPackagePath+" ] || pkg install clang -o . DPkg::Options::=\"--force-confold\" --no-upgrade -y\n"+ "[ -d "+apiPackagePath+" ] || git clone . https://github.com/albbus-stack/snap4all-termux-api-package\n"+ "[ -f "+apiPackagePath+"/Makefile ] || ( cd snap4all-termux-api-package
. && cmake CMakeLists.txt )\n"+ "[ -f "+apiPackagePath+"/libtermux-api.so ] || make\n"+ "[ -f "+apiPackageInstallPath+" ] || make install\n"+
// Installs node-red
...
// Installs node-red-contrib-termux-api
...
// Changing index.js of node-red-contrib-termux-api to an updated one . with the new node.js function signatures
"[ -f "+isInstalled+" ] || cd $HOME\n"+
"[ -f "+isInstalled+" ] || curl . https://raw.githubusercontent.com/albbus-stack/node-red-contrib. termux-api/master/index.js > . index.js\n"+
"[ -f "+isInstalled+" ] || mv index.js ../usr/lib/node_modules/node. red/node_modules/node-red-contrib-termux-api/\n"+
// Installs node-red-dashboard
...
// Installs node-red-contrib-snap4city-user
...
// Installs node-red-contrib-snap4city-developer
...
// Downloads and moves the node-red flows example to the node-red folder
"[ -f "+isInstalled+" ] || cd $HOME\n"+

"[ -f "+isInstalled+" ] || curl . https://raw.githubusercontent.com/albbus. stack/snap4all/master/flows.json > . flows.json\n"+
"[ -f "+isInstalled+" ] || mv -f flows.json .node-red/\n"+
// Enables the buttons on the main page and starts the node-red server, . this part executes every time on boot since it has no modifiers
"[ -f "+isInstalled+" ] || touch $HOME/installed\n"+ "termux-toast \"starting node-red\" && "+vibration+"\n"+ "termux-enable-buttons\n"+
// Runs node-red and, if it terminates with an error, will run this . script again
"node "+nodeRedPath+" || $HOME/.termux/boot/start\n";
Code documentation and log removal
We have consistently documented all parts of the pre-existing code and code we added, so we have updated deprecated part of code and removed all unnecessary debug logs, keeping exception-handling logs.
![]() Esempi di documentazione // A boolean to store the installation status
Esempi di documentazione // A boolean to store the installation status
public static boolean installed=false;
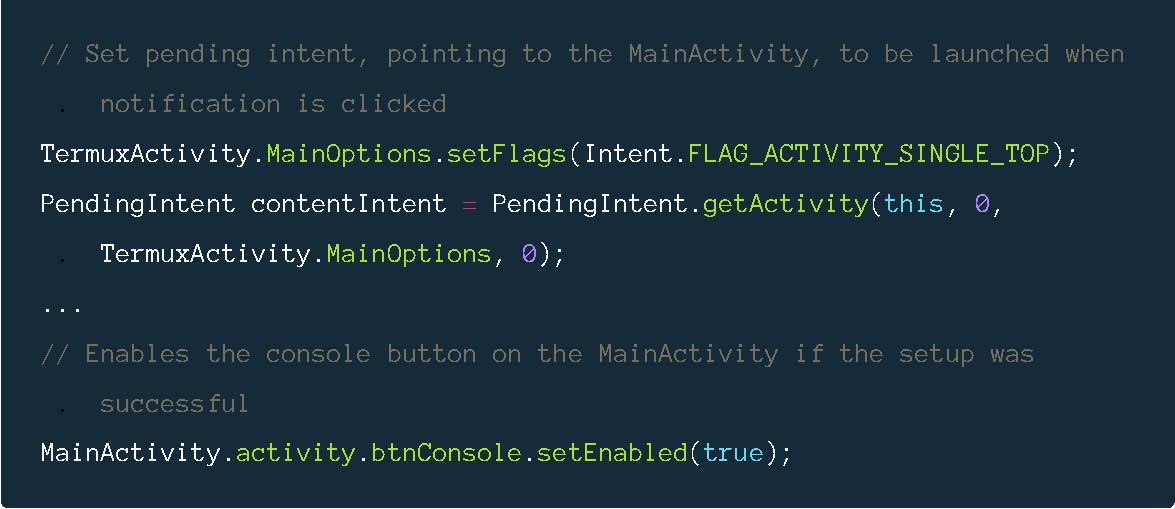
// An Intent used to launch and reference the MainActivity
public static Intent MainOptions; ...
// Changes the console ActionBar title
Objects.requireNonNull(getSupportActionBar()).setTitle("Console");
// Starts the MainActivity on creation
MainOptions = new Intent(this, MainActivity.class); startActivity(MainOptions); ...
3 New features
3.1 Restart not required
In the previous version of Snap4All, it was necessary to restart the device so that Termux would run the installation script via the Termux:Boot module after booting. This installation mode resulted in an unnecessary wait by the user (as well as not being very reliable on some devices), since we can call the installation script every time a session of a Termux console is initialized. We have this possibility thanks to a basic functionality of every Unix system that uses bash as a shell, namely to call our script from .bashrc. Every command written in this file is then executed at bash startup.

3.2 Installation speed
The old bootstrap archives that were used in the Termux installation did not contain any additional apt packages, thus making the subsequent installation process much longer than necessary. By directly adding the packages we need in the Termux filesystem we are only going to increase the weight of the final application, drastically reducing waiting times during the setup of Snap4All.
3.2.1 Full bootstrap build via Linode
To build the complete application with updated bootstrap archives it is needed a machine with at least 8 GB of RAM to be allocated exclusively to the Java build process; this is due precisely to the large size of the .zip to be decompressed. Having therefore a very common physical limitation, we had to set up a server dedicated to building the full .apk, generalizing this process as much as possible. By creating generate-and-build.sh 10 we made our server configuration replicable. This script is responsible for:
- Generate bootstrap archives including the input specified packages.
- Install Java and the Android SDK.
- Clone or update the Snap4All repository.
- Build the application, copying the .apk files generated in an immediately reachable folder.
We used a server hosted by Linode for the connection speed, the wide availability of RAM and the ease of replication of that environment; clearly the script can be used on any other Unix server/system. The machine we used was a Linode 16 GB with Debian 11 installed.
3.3 User interface remake
Home page layout (MainActivity) Using the components of MaterialUI available through the materialcomponents-android 11 library, we updated the design of the home page. Now the four buttons present are MaterialButtons that implement the "active" and "disabled" states, not only in terms of the button color but also the opacity of the relative icon. We have also added, along with the title of the application, a subtitle that briefly describes the features of Snap4All. Figure (a) on page
11.
10https://github.com/albbus-stack/snap4all/blob/compile-branch/ generate-and-build.sh
11https://github.com/material-components/material-components-android
Information page and console layouts (InfoActivity and MainActivity) We later modified the old application information page, consisting of a Web-View showing the info.html 12 file. So, we have rewritten the documentation that explains how Snap4All works and directs the user to other sources to deepen his use of the individual packages included in the application. To make the design consistent with the home page we inserted CSS inside the file quoted above. Figure (b) on page 11.
In the old version there was a problem with the Termux sidebar (where the various active sessions of the console are listed): the icons were not shown and the background was completely transparent, thus making the use impossible. Figure (c) on page 11.
Vectorial assets and quick actions
To conclude the user interface part we have vectorially retraced Snap4City 13 logo to be used as .svg, i.e. making it fully scalable to any resolution. We have proposed two versions, one colored equal to the original and one more minimal monochrome, to be used as a notification icon. These are included directly in a folder 14 of the Github repository. We have further changed the quick action key icons for consistency. Figures (d) and (e) on page 11.
4 Example Node-RED Snap4City flows
We then created two sample flows that make use of the node-red-contribsnap4city-user 15 and node-red-contrib-snap4city-developer 16 , which are part of the Snap4City node suite. These are added automatically during installation, always in the setup script, going to copy into the folder .node-red
12https://github.com/albbus-stack/snap4all/blob/master/app/src/main/assets/ info.html
14https://github.com/albbus-stack/snap4all/tree/master/logos
15https://github.com/disit/node-red-contrib-snap4city-user
16https://github.com/disit/node-red-contrib-snap4city-developer
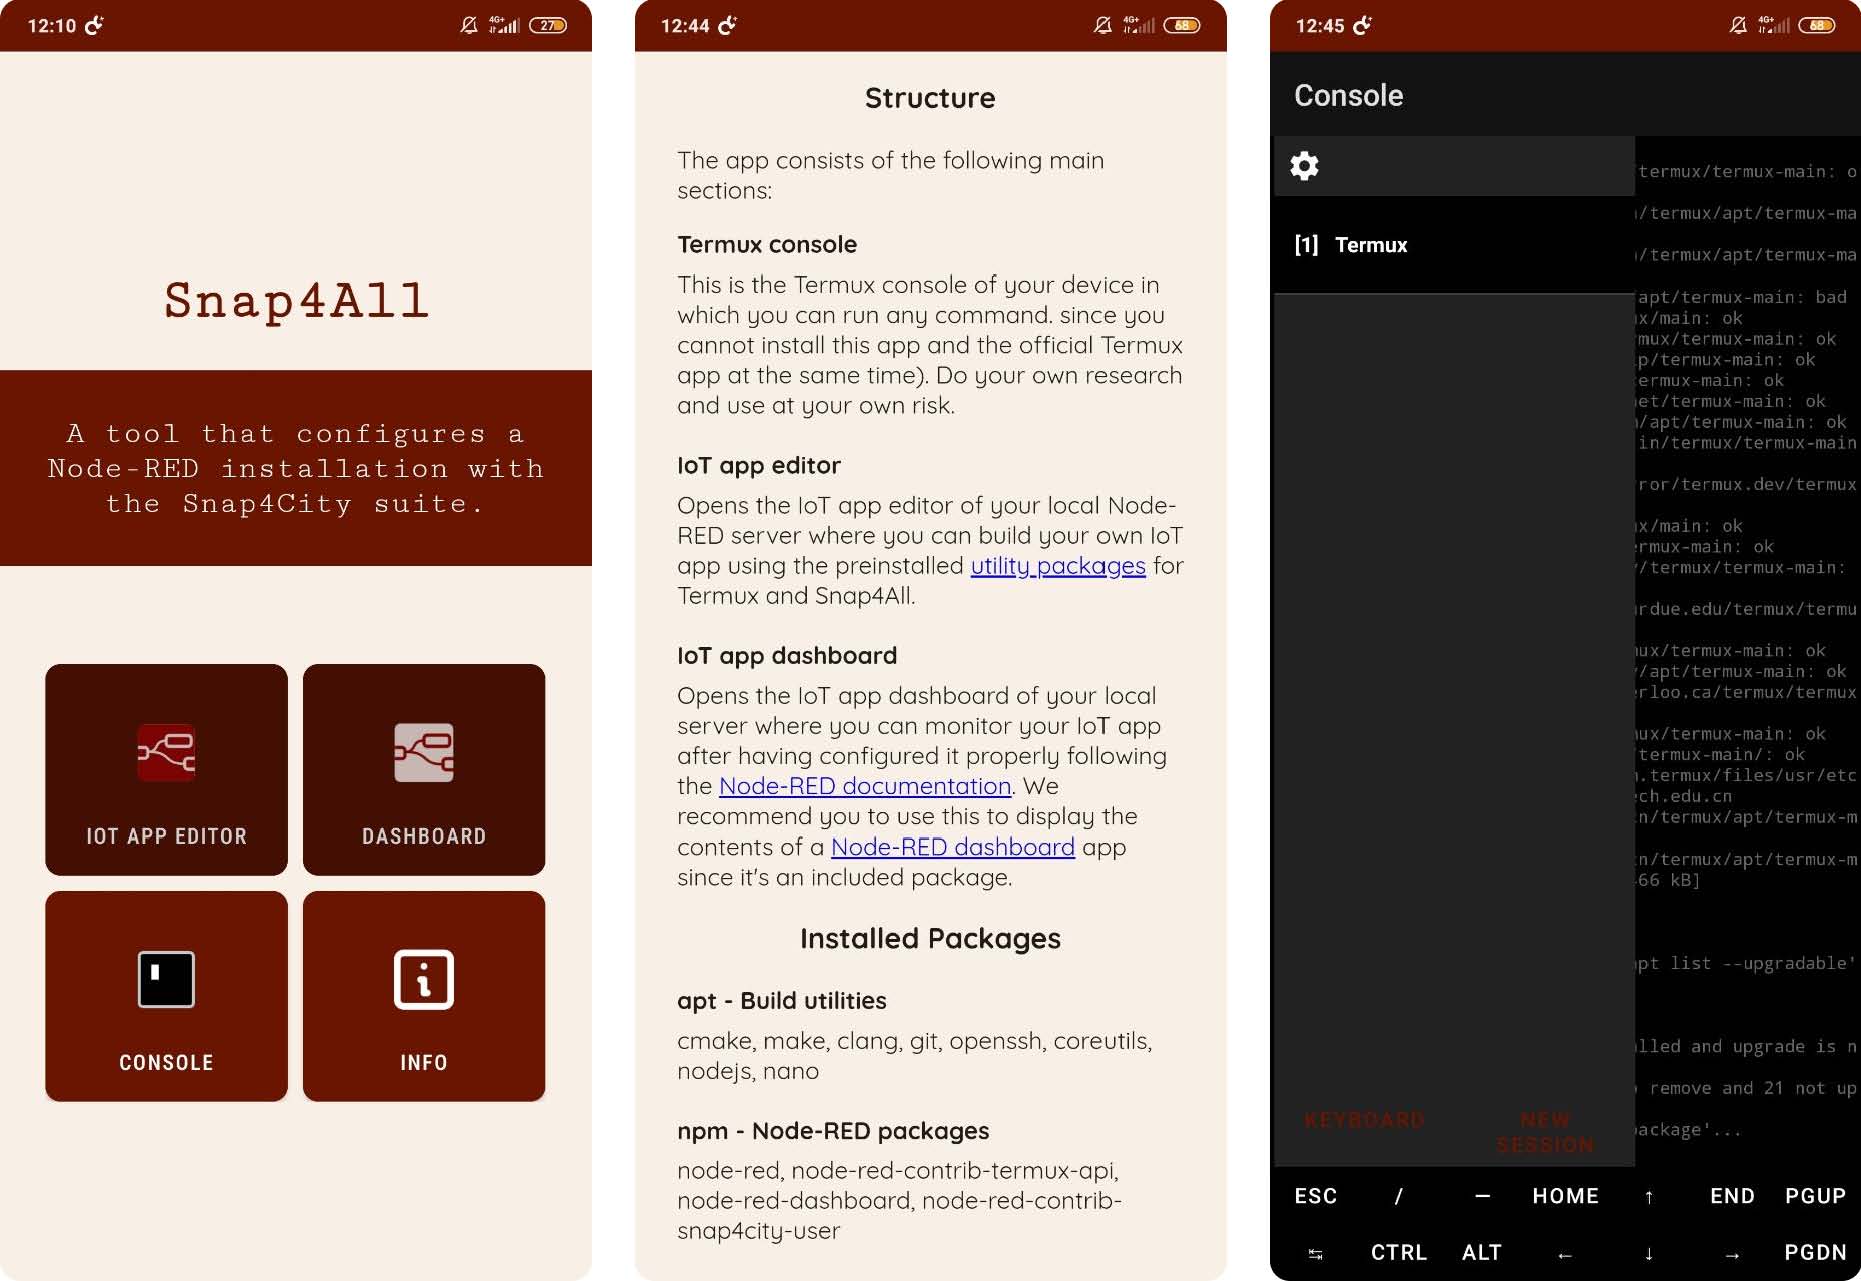
(a) Home (b) Info (c) Console
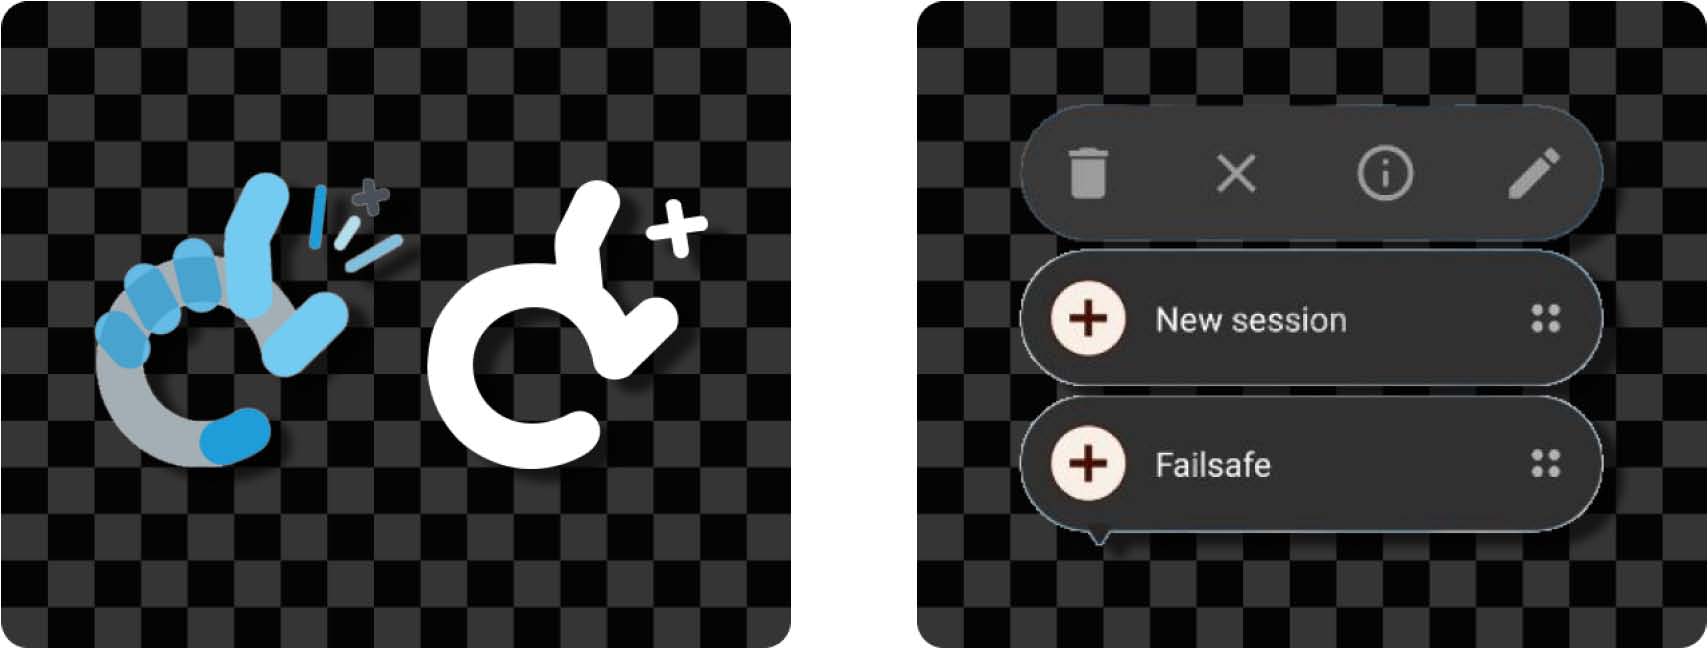
(d) Vector logos (e) Quick actions
the flows.json 17 file so that Node-RED loads these flows when initializing the local server. To correctly use the first two example flows you need to configure the credentials to Snap4City by following the tutorial on the information page.
4.1 First example flow – Battery
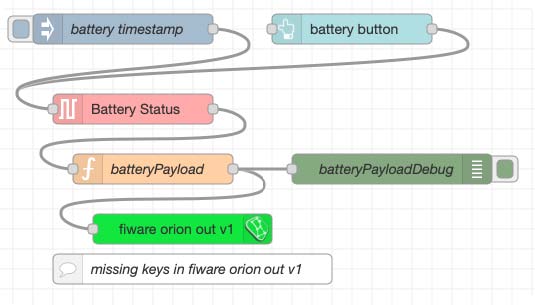
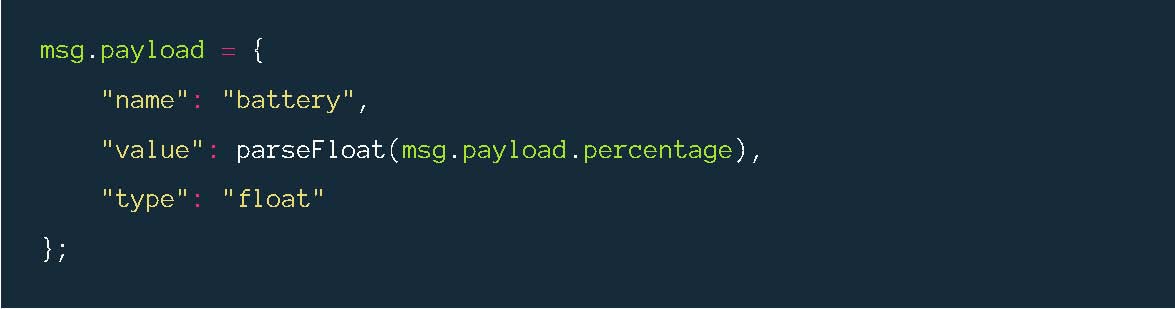
The flow extracts the battery percentage of the device via termux-batterystatus 18 node. This string is then converted to a float in the function node. Subsequently, the msg.payload is transformed into a string and passed to the fiware orion out node that will send it to the Snap4City broker, containing an IOT device with a certain name corresponding to the two fields key_1 e key_2 compilati filled in during the node setup.
![]()
17 https://github.com/albbus-stack/snap4all/blob/master/app/src/main/java/ com/termux/app/flows-example.json 18 https://wiki.termux.com/wiki/Termux-battery-status

4.2 Second example flow -Wifi
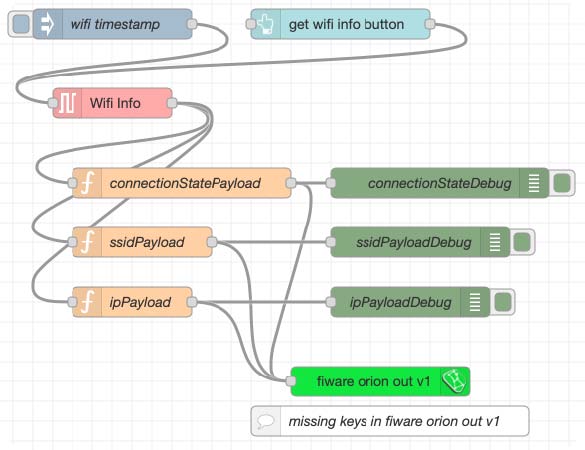
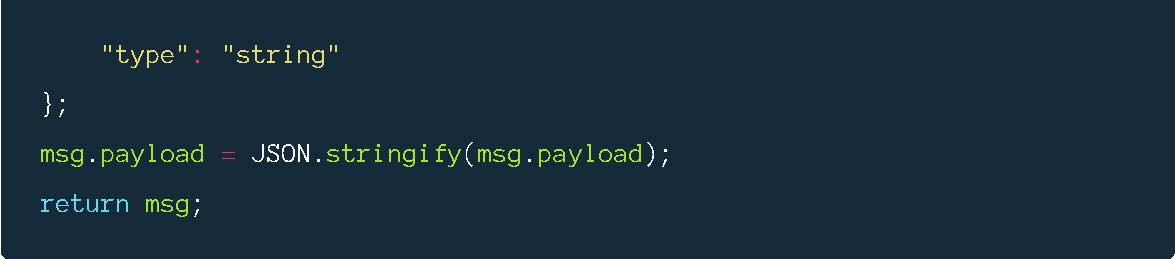
When the flow starts the Wifi Info node node calls the API termux-wificonnectioninfo 19 that retrieves the connection status, the SSID, and the IP address. This information enters the three function nodes conncection-StatePayload, ssidPayload and ipPayload, which manipulate the information received and convert the resulting object into a string. As in the first example flow, information will be sent through the fiware orion out node.
![]()

19https://wiki.termux.com/wiki/Termux-wifi-connectioninfo
4.3 Third example flow -Transport agencies
Once the flow starts, two subflows are performed in parallel:
1. numbers subflow
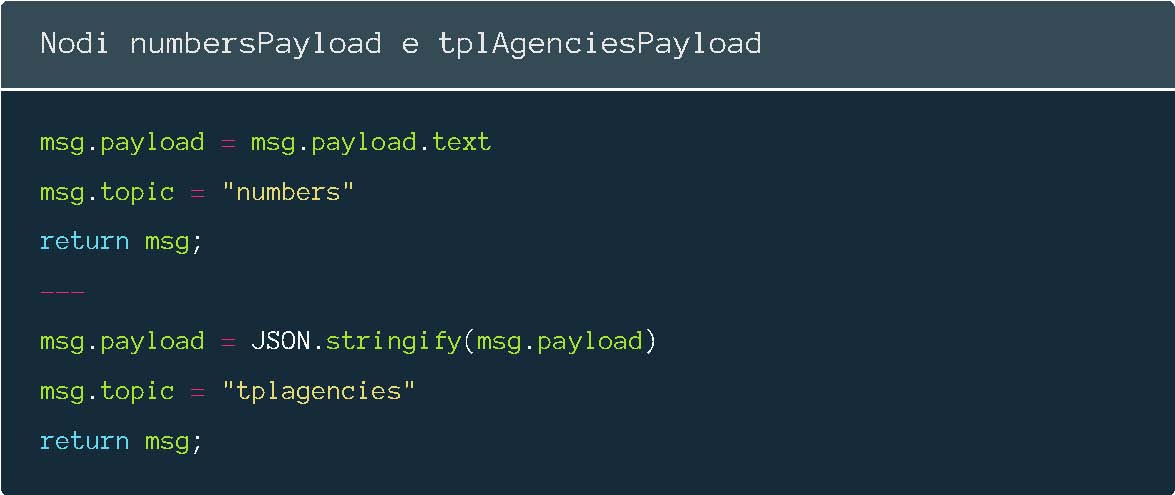
The Dialog node calls the termux-dialog 20 API which displays a window asking the user to enter a phone number. To process this input, the payload is passed by the json node which converts it from a string to an object. The message enters the numbersPayload node function which extracts this input and adds it as topic numbers.
2. tplagencies subflow
The tpl-agencies 21 node provides a list of public transport agencies available on Snap4City. The JSON containing this list enters the tplAgenciesPayload function node which converts it to a string and adds tplagencies as topic.
20https://wiki.termux.com/wiki/Termux-dialog
21 https://github.com/disit/node-red-contrib-snap4city-user/blob/master/ tpl-agencies.js
4.3.1 Join subflows
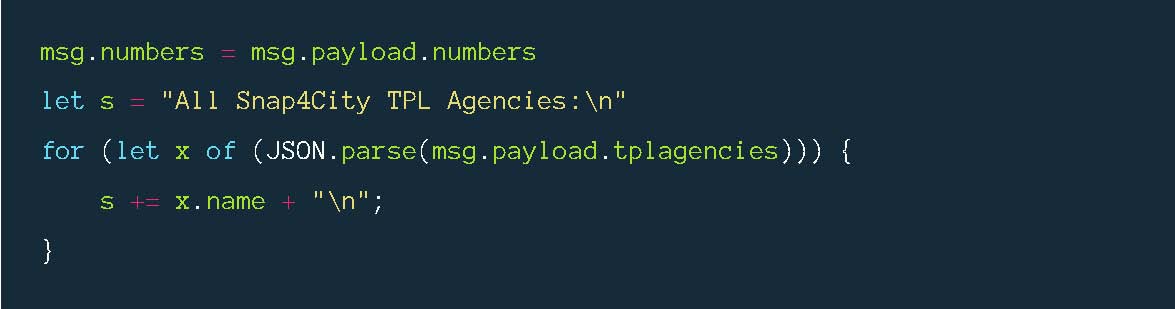
In the join node the two subflows are joined in a unique msg.payload, indexed according to the names of the topic, which waits for the arrival of both messages before continuing the execution of the flow (through the setting Send the message after 2 message parts and every subsequent message). The information enters the textPayload function node which:
- Assigns msg.numbers to the msg.payload of the first subflow that contains user input.
- It cycles on all JSON objects contained in the msg.payload.tplagencies (corresponding to the second subflow) and sets a string with all the names of the transport agencies that will then be assigned to the final message.
In the end, the SMS Send node calls the termux-sms-send 22 API which sends an SMS to the number corresponding to msg.numbers containing the just set string.
![]()
22https://wiki.termux.com/wiki/Termux-sms-send
