Please note that in Snap4City Global and Local Digital Twins are integrated with IOT models, maps, heatlamps, etc.
Snap4BIM is a web application that adds interactive objects in a 3D BIM project. It offers two different interfaces. Viewer is the simplified version of the main interface where users can interact with the application but can not make changes to the data. The main viewer interface which is the complete one, offers the possibility to add, modify or remove pin data.
Snap4BIM is an application for
-
Connecting BIM models with ServiceURI data into Snap4City, Snap4Industry, so that they can be: IoT Devices, POI, etc.
-
Observing PIN from any view
-
Positioning PIN in any place of the 3D space
-
Accessing to any element of the 3D model and to any position with the 3D interactive viewer.
-
Controlling the user interface interaction.
-
Showing the data, and selecting the 3D elements
Snap4City/Industry can pass from any PIN on map to BIM / Digital Twin Local and related data in click
1.Snap4BIM Interface
1.1Navigation toolbar
A toolbar is available on the top of the main view. This toolbar has some functionalities that help with camera control in the 3D view and also allows to modify the application interface on the basis of your needs.
![]()
The available commands are as follow:
- Toggle visibility of sidebars
- Toggle visibility of time trend graph
- Default camera navigation
- Camera navigation pan
- Rotate camera horizontally
- Reset color changes and visibility of elements in the 3D view
- Display a help page with command shortcuts
1.2 Sidebars
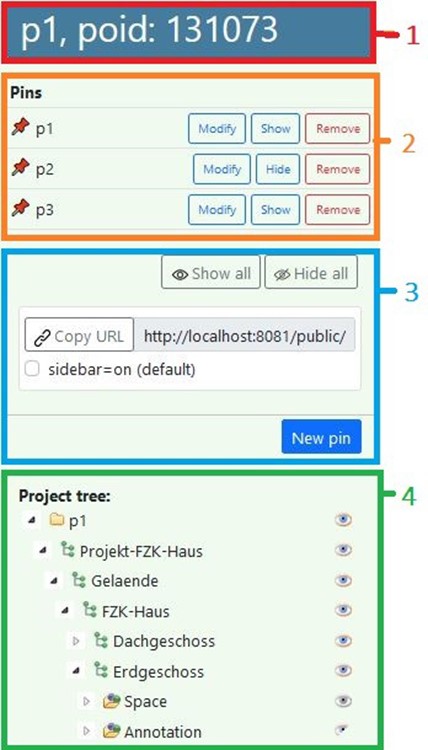
The main sections in the left sidebar are as shown in the following image:
- Project name: Displays project title and ID
- Pin list: A list of pins that are available in the loaded project
- Modify to modify pin data;
- Show/hide pin on the 3D view;
- Remove pin from database.
- Other control buttons:
- New pin opens the right sidebar form in which we can enter pin data and save it into database;
- Show all makes visible all the available pin in the selected project;
- Hide all the available pin in the selected project;
- Copy URL for the simplified viewer. Use checkbox to add or remove the sidebar to the URL.
- Project tree: A tree structure with all the elements that are part of the loaded BIM project
- Colored eye icon, the element in that row is visible in the 3D view;
- Half colored eye icon, the element in that row is trasparent in the 3D view;
- Grayed eye icon, the element in that row is not visible in the 3D view.
Note: The left sidebar has limited functionality in the simplified viewer page
In the right sidebar the user can add new pins or modify the existing ones. It is presented with a form where the user has to enter a title, a description and a service URI from Snap4City referred to the device to connect. The other formfields are disabled, the application fetches data related to the inserted service URI and fills the corresponding Nature, Subnature and Pin icon as soon as the focus is removed from the service URI field. To position the pin in the 3D world the user has to click the Pick button and then to click on the 3D representation in the point where the pin has to be located. To save the data into database click Submit, otherwise Cancel to hide the form from the view. The Reset fields button resets all the fields in the form.
Note: The right sidebar form is not available in the simplied viewer page.
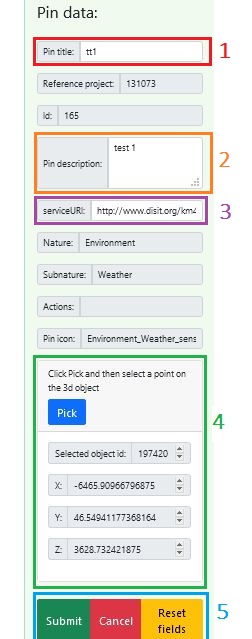
- Pin title: enter pin title;
- Pin description: enter pin description;
- Service URI: enter service URI from Snap4City, click somewhere in the form to remove focus and the disabled fields will be filled automatically with the related data;
- Pick: click on Pick button then select a point in the 3D view, the coordinates will be lled automatically based on the selected object and it's position in the 3D world;
- Submit/Cancel/Reset fields: submit to save data into database, cancel to hide form from view and reset elds to empty form fields.
1.3 Time trand graph
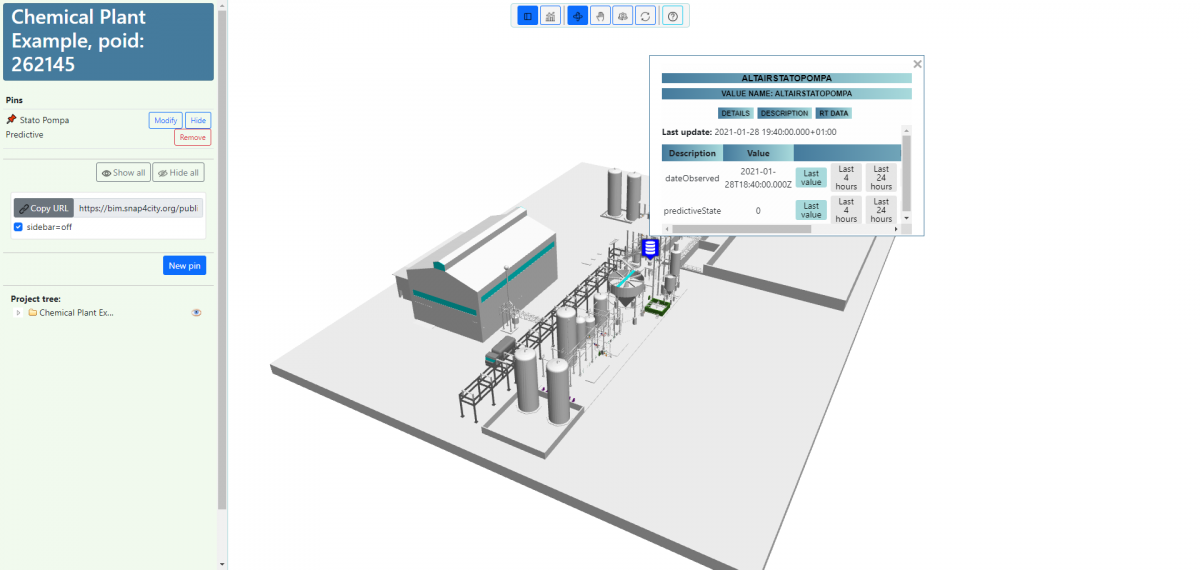
By clicking a pin on the 3D view, the corresponding data are shown in a pop up window. In the case of real time data, the diffferent available values and trend can be also shown in the widgets available below the main 3D view, as shown in the following image. Different time trends can be shown, according to the different interval period selected on the pin pop up window. The data are shown as follow:
1. Last Value: displays the last value measured by a given sensor for a given quantity.
2. Time Trend Chart: displays the time trend of a measured quantity based on the interval selected in the pin popup window.

1.4 URL path variables
URL path variables help on configuring the user interface and camera position in the displayed 3D view when application loads a certain project.
// example url with parameters
http://localhost:8081/public/add.html?poid=131073&pins=http://www.disit.org/km4city/resource/METRO11,http://www.disit.org/km4city/resource/iot/orionUNIFI/DISIT/corlucca&timetrend=off&sidebar=on&eye
=[-19312.400390625,-19822.744140625,6480.2294921875]&target
=[-2031.83447265625,-2196.131103515625,1557.6241455078125]&up
=[0,0,1]&fovy=45&type=persp
// url parameters
// -poid=131073 // project id
// -eye=[-19312.40,-19822.74,6480.22] // eye = [x,y,z]
// - target=[-2031.83,-2196.13,1557.62] // target = [x,y, z]
// - up =[0 ,0 ,1] // target = [x,y,z]
// - fovy=45 // camera angle expressed in degrees
// - type=persp // camera projection "persp" or "ortho"
// -pins=http://www.disit.org/km4city/resource/METRO11,http://www.disit.org/km4city/resource/iot/orionUNIFI/DISIT/corlucca
// pins=serviceURI1,serviceURI2... or null
// - timetrend=off // on or off
// - sidebar=on // on or off
URL path variables you can use:
1. poid: in the simplified viewer, passing a project id as a parameter the application loads the project with that id. In the main viewer page this doesn't work because at every reload the application displays a list of projects to choose and the passed URL parameter is ignored.
2. eye, target, up, fovy, type: these parameters configure the 3D world view, based on values passed you can obtain a certain view of the 3D project.
3. timetrend: it can be on or off. If on the application starts with time trend chart visible otherwise it is hidden
4. sidebar: it can be on or off. If on the application starts with sidebars visible otherwise they are hidden.
5. pins: it can take an array of pin icon serviceURI. When application starts, it display the pins which ids are passed in the URL parameter. If passed null it hides all otherwise if parameter is empty it shows all.
2. How to?
2.1 Add new pin
To add a new pin, you should have access to the main interface. In the left sidebarfind the New pin button and click it, then a right sidebar containing a form will be displayed.
Insert title, description, service URI and pick a location in the 3D view for the pin to be positioned. Click Submit to save it.
2.2 Remove pin
To remove a pin, you should have access to the main interface. In the left sidebar you can find a list of existing pins. For each pin you can find a Remove button. Click Remove and confirm to remove the pin from the database.
2.3 Modify pin data
To modify pin data, you should have access to the main interface. In the left sidebar you can find a list of pins and for each pin a Modify button. Clicking on Modify button it will display in the right sidebar a prefilled form with the pin data. After finishing with changes, click Submit to save data into database.
2.4 Hide an element in the 3D view
To hide an element in the 3D view, select the object in the 3D view and pres the "h" key in the keyboard.
2.5 Use section plane
Press and hold Ctrl key from keyboard, position the cursor in the view pane where you want then click with the right mouse button and drag it in the opposite direction.
2.6 Add and visualize a 3D view in a dashboard
Once the user has competetd the creation of a 3D view by adding new pins and by connecting the pins to specific devices and serviceURIs, it is possible to make this 3D representation of the Digital Twin available in a dashboard with the same view settings defined in the editing mode.
1. Click the Copy URL button below the pin list on the left sidebar.
2. Enter in the dashbaord in Edit mode;

3. Click on the "Add widget" button on the top menu and select:
- as "Widget Category: Data viewer",
- Metrics category: Shared metrics
- Metric: External Content
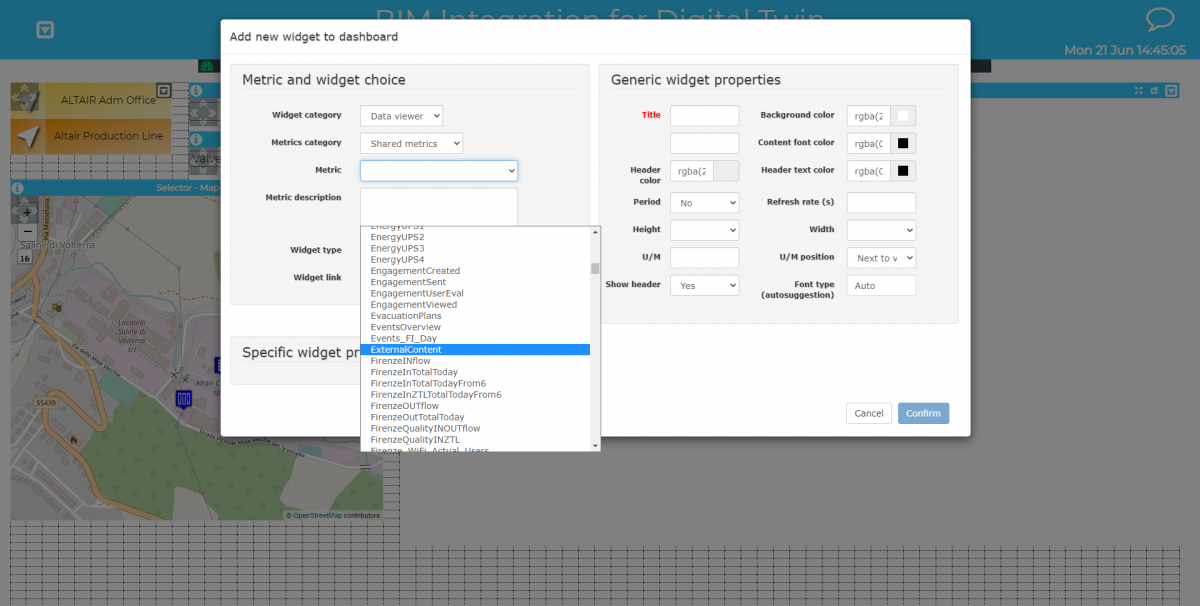
4. As widget link copy the URL from the clipboard;

5. Click confirm. The 3D view is now shown in the external content widget.
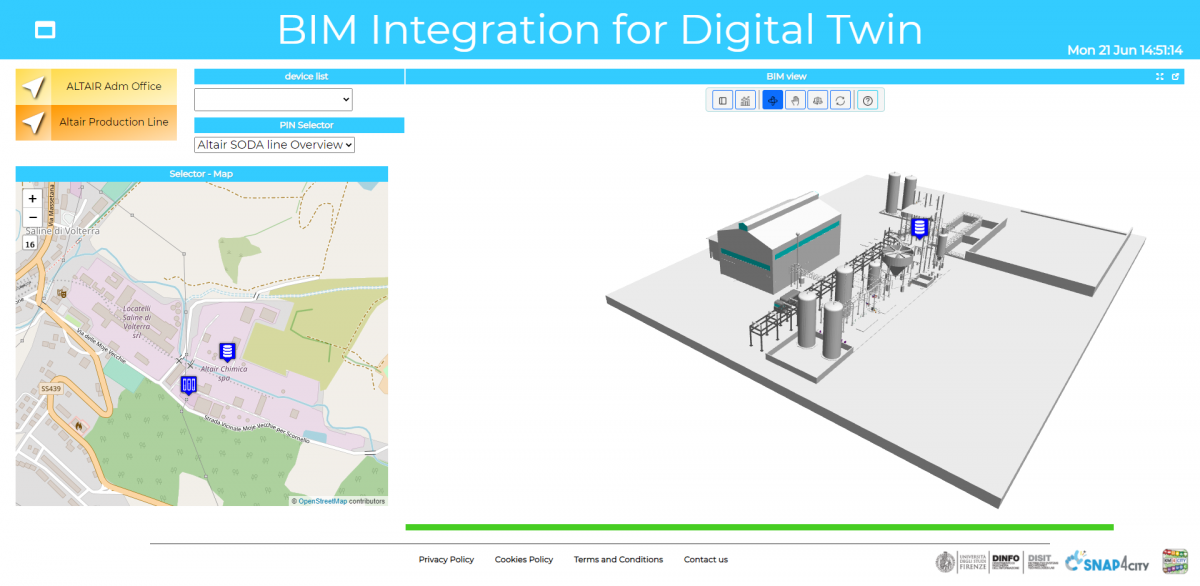
Please note that the links of the 3D view can be exploited also in a Selector widget or in a dropdown node in an IOT App.
3. References
- BIMServer - https://github.com/opensourceBIM/BIMserver
- BIMSurfer - https://github.com/opensourceBIM/BIMsurfer