Version 4.4 of 2024/04/22 of this web page
The Docker Config Generator x Snap4 Tools is presently accessible from the main menu under "Deploy and Installation".
Access to the Docker Config Generator x Snap4 Tools
Last release of the Generator is of the 2024-01-15 with AWS trial Kubernetes
The latest release introduce many features, such as:
-
The api key for google 3d maps is now exposed in the generator; you might use your own key during your generation.
-
Multiple tests which you can run to troubleshoot errors you might encounter.
-
The checker app can be extended to support custom commands to automate or simplify any task
-
Https for the main service, with an addition of a certbot container to generate your certificates
-
Latest updates in the user interface
-
Tools to backup and upgrade an old distribution to the newest one
-
Tools to generate kubernetes distributions based on a Micro X installation; which can in turn be refined to work on an AWS cluster.
Snap4City & Snap4Industry Registered Instances Installations
for default Passwords of the VM and dockers see: https://www.snap4city.org/487, in docker based installations the passwords are also in the docker compose!
- TECHNICAL OVERVIEW: https://www.snap4city.org/download/video/Snap4City-PlatformOverview.pdf
- Development Life Cycle: https://www.snap4city.org/download/video/Snap4Tech-Development-Life-Cycle.pdf
- Booklet Data Analytics, Snap4Solutions: https://www.snap4city.org/download/video/DPL_SNAP4SOLU.pdf
- MicroX troubleshooting ENG: https://www.snap4city.org/download/video/TroubleShooting-MicroX-on-premise-en.pdf
- MicroX troubleshooting ITA: https://www.snap4city.org/download/video/TroubleShooting-MicroX-on-premise.pdf
- Monitoring Tool for MicroX: https://www.snap4city.org/download/video/MIcroX-monitoring tool with images-v0-1.pdf
- How To add a Node to OpenSearch: https://www.snap4city.org/download/video/snap4city_elasticsearch_add_node.pdf
- Note on Kubernetes: if you decide to generate the version for Kubernetes, please download and follow the instructions into the single folders of the installation files provided
- download the notes: https://www.snap4city.org/download/video/Snap4City-Generation-Kubernetes-V0-1.pdf
Former version of intallations based on VM at page https://www.snap4city.org/471
This web page aims to prepare you entering into the Docker Config Generator Tool, and to provide you the minimal suggested info of the VMs involved in the installation.
This page is describing a tool for generating installation files for a number of different configuration models each of which with a set of parameters.
The main idea of the Snap4 Configuration Tool is to:
- allow you to select a configuration on the basis of the purpose
- provide you a wizard that is going to ask you information such as: IP, names, IDs, number of features interested
- generate for you a set of installation files to perform an almost automated configuration based on Containers on your VMs on any cloud/servers
- save the installation files to be reused by you in other installations, also modifying some parameters.
The installation files are generated for a number of proposed configurations with a number of scalable parameters.
Depending on the configuration a different number of VMs will be suggested and the configurations will be provided for each VM.
- We suggest you to use Debian distribution for the VM. You can get the ISO from https://www.debian.org We also suggest to execute your VM on cloud environment as Vmware or similar.
- in each VM, the docker and docker-compose have to be installed, please verify their correct installation.
- each VM should have at least 10 Gbyte of RAM, more than 50 Gbyte of HD, but this is going to depend on the data you would like to have, and 8 cores or virtual cores. The precise size of the VM (in terms of Memory, CPU, Storage) can be computed only at the end of the Docker Config Generator process when all needed information for their computation will be provided by you to the tool, and when the number of VM are also known.
- The VM have to provide a network connection with the IP that you have to provide in the file generation process. If you execute the VM into VMWare player, the VM network has to be bridget and not NAT.
- Security: please note that all the solutions are configured assuming that a firewall in front would be included by you before putting it accessible on Internet. So that it is supposed that you are going to install the solution/microx behind a firewall opening only the ip and ports for smart city API, that is the 80, and few others: geoServer, Heatmap server, etc., so that only what is actually needed to be accessed from clients (web, mobile app, devices, etc.). This is obvious also to have a FW in the front when multiple VMs are used in larger models.
Once you decided for a Configuration Model, before entering on the Snap4 Docker Config Generator you need to have the IP addresses of those VMs.
if you are not capable to complete the Docker Config Generator process for the lack of data, the tool is providing you a CODE/Token to enter egain and restart from the configuraiton you performed.
Please note that, the Configurations are anonymous, so that you can use the Configurator without exposing your email or nickname.
Each configuration is saved as a TOKEN and you can access again to it any time, to download the produced configuration/deploy files, and to create other configurations starting from those you have already generated, by changing the detailed parameters but not the size of the configurations in terms of X, Y, Z, K.
The Configuration Models described in the following are the evolution of the DataCitySmall/Large configurations which is accessible as installation and guidelines in other web pages https://www.snap4city.org/471
For each Configuration Model, we are providing a description of the typical usage and the meaning of the parameters.
The meaning of X, Y, Z of the Configuration Models are identiical in all models:
- X: is the number of IoT Applications, which are Node-RED containers, X>=1
- Y: is the number of IoT Orion Broker V2 FIWARE, Y>=1
- Z: is the number of Knowledge Bases, KB, Service Maps created into the solution. Z>=1; they are typically 1:1 with the Organizations. You can have multiple KBs for the same org. as well. Please note that the KBs are the providers of Smart City API, and Super Smart City API, SCAPI.
MICRO X includes
|
Dashboard: Dashboard Builder, database, cron, backend, Synoptic. |
Dashboard Builder for creating dashboards of several kinds, and distributing them, in connection with IOT Applications, including Dashboard Wizards and Native Widgets. A large number of widgets and dynamic: time series, bar series, kiviat, multiseries, single content, buttons, tables, event driven with synoptics, etc., most of them allow you to browse on time, etc.) Dashboard engine, for collecting data from several data sources with a Pull approach and save them on local database of Dashboard Builder. The Dashboard engine is compatible with several protocols. Data Inspector: for exploring the data accessible on the solution, for managing the collection of data, links to processes, links to IOT Apps, licensing models, owners, etc.) SQL like database, local instance for configuration and data management. External Service manager: to collect external services, legacy servers and tools and exploit them on Dashboards. Please remind that External Services as web pages can be also embedded into Dashboard widgets. MenuManager: to manager different tools connected on a Snap4City environment, also external services, legacy servers, etc. Also having menu attached to the single organization and single dashboards. MicroApplications Manager: to link a set of MicroApplications which can be tuned on the content accessible on your area. MicroApplications can be embedded into Dashboards. IOT Directory: to manage IOT Brokers. Models and Devices. The IOT Directory needs at least a ServiceMap and to perform IOT Discovery. The IOT Directory allows at the users to add IOT Dev models, IoT Devices, IOT devices in bulk, to manage delegation on devices and IOT Devices values, etc. Synoptic: managing templates and instances of synoptics on dashboards using MyKPI, sensors, costants, variables on WS, IoT Apps. OwnershipsManager: to manage users’ ownerships and delegations to access at different kinds of data and resources, delegation to access, revokations, etc. Resource Manager: to publish, exchange and access resources developed for other smart cities and Snap4City solutions; The Resource Manager includes a market place for IOT Applications and flows, ETL processes, Data Analytic processes, etc. User Management: for registering users, and define their role. Data Table Loader: tool for loading data from excel regarding IoT Device Model, IoT Devices and messages, device instances |
|
Processing: X IoT Apps, static allocation |
IoT-Apps are Node-RED + Snap4Ciy Libraries as Container Images. They can be statically allocated. Snap4Ciy Libraries allow to access at al lthe infrastructure functionalities in terms of MicroSerivices, with automated authentication and authorization. They can be also installed on Edge, several kind. |
|
IoT Broker: Orion Broker, Mongo, Orion Filter |
FIWARE Orion Broker with Snap4CitySecure Filter for managing authentication and authorisation to post and read |
|
Knowledge base: Virtuoso, ServiceMap, super, SCAPI |
RDF store with Km4City ontology. It has to be filled with an initial map of your location area taking data from OSM if you needto perform georeverse. Othervise you can avoid. |
|
Storage: NIFI, OpenSearch/ OpenSearchDashboard, Personal Data (MyKPI) |
Storage for time series and MyKPI (they can go on SQL like storage or on this one) based on OpenSearch. Also include an early DevDash as Open Search Dashboard. |
|
Communications: Kafka, Zookeeper, WSServer, proxy |
Kafka/ Zookeeper for managing the communications from Synoptics and Dashboards. WebSocket Server for secure communications among IOT Applications and Dashboard widgets. Proxy for mapping the main IP to the intrenal components and eventually other VMs. |
|
Author&Authen: LDAP, MyLDAP, KeyCloak |
Authentication tool, Single Sign On, SSO: for registering users and managing keys (keycloak based), LDAP support for managing roles and organizations. |
|
OD Manager, OD insert, OD converter, PostGres |
Origin Destination Matrix manager for rendering on Multi Data Map Widget. |
| FIWARE Smart Data Model Harvester | Including iot-fiware-harvester that is the tool for integrating and managing the FIWARE Smart Data Models, the full collection of smart data model is ingested and become usable for the iot data modeling and management |
In the following configurations, what is OPTIONAL can be added at ANY TIME, such as:
|
1 More IoT Broker on VM if there is space |
On one of the configurations |
|
1 More VM of 10 IoT App |
On one of the configurations |
|
1 More VM of OpenSearch, storage segment |
On one of the configurations |
|
Balancing on Dashboard |
1 more Front end and Balancer |
|
Balancing on API |
1 more Front end and Balancer |
|
Adding Modules, as VM or dockers, Installation of |
Details |
|
Heatmap Manager, Traffic Flow Manager, ColorMap Manager, GeoServer |
Included in Normal x,y and Small X,Y (docker) (this feature is going to be added into the main MicroX soon) |
|
Container Manager |
Not full version, only allocation on static VM |
|
RStudio Server |
Data Analytics, VM, non in SSO, on top of container manager |
|
Jupyter Server |
Data Analytics, VM, in SSO, on top of container manager |
|
POI Loader |
Script, PHP, etc. |
|
BIM Manager and BIM Server |
VM, docker, Digital Twin Local https://www.snap4city.org/730 |
|
OpenMaint |
for ticketing maintenance in seperate Docker/VM |
|
DRUPAL for Snap4City, CRM |
Living Lab, Docker/VM |
|
TV Cam Manager, based on Kurento and Turn |
Several VM / Dockers: read HOW TO: TV Cam Manager, based on Kurento and Turn |
|
Routing Server |
based on Graphhopper, integrated with Multi Data Map, Scenario for dynamic routing. |
|
API Accounting, APIMAN |
Smart Ciy API and Broker: see HOWTO: APIMAN manage API accounting: smart city API, broker API, etc |
|
Report Generator |
Device level, Dashbord level, City Level, details ?? https://www.snap4city.org/720 https://www.snap4city.org/721, https://www.snap4city.org/728 |
|
Mobile App Customization |
Depending on the number of views, and data accessible https://www.snap4city.org/489 |
|
Micro App Customization and Deploy |
Depending on the number of views, and data accessible https://www.snap4city.org/drupal/node/489 |
|
Converter geo info from OSM to ServiceMap |
per single province, città metro, region, etc. https://www.snap4city.org/175 |
|
OpenSearch Dashboard custom on purpose |
additional development on Open Search Dashboard to customize |
| CKAN and Data Gate | please ask to Snap4City, https://www.snap4city.org/632 |
| Users' Engager on Mobile Apps | please ask to Snap4City, https://www.snap4city.org/548 |
| SSM2ORION | please ask to Snap4City, https://www.snap4city.org/467 |
| MultiModal Routing | please ask to Snap4City |
| Data Quality Control | please ask to Snap4City |
| Web Scraper on Container | please ask to Snap4City, https://www.snap4city.org/515 |
| Transmodel Chouette | please ask to Snap4City |
| Usage of Twitter Vigilance service, server, Multilingual | please ask to Snap4City |
| Notificator | please ask to Snap4City |
| Chat Manager for Dashboards | please ask to Snap4City, https://www.snap4city.org/515 |
| Video Wall Manager for Control Room | please ask to Snap4City, https://www.snap4city.org/621 |
| Satellite Data Collector, Converter | please ask to Snap4City, https://www.snap4city.org/671 |
| LOG for knowledge base browsing | please ask to Snap4City, https://www.snap4city.org/21 |
| LOG for System Application Browsing | please ask to Snap4City, https://www.snap4city.org/21 |
| Loader of WKT shapes on ServiceMap, KB | please ask to Snap4City, https://www.km4city.org/wkt/ |
|
examles of Data Ingestion, Transform, from: |
Details |
|
GTFS data ingestion |
Complexity depend on the are, number pof agencies, number of ICONS, lines, busstops |
|
IoT Device: Pollutant, Waste, Water, Parking, Bikerack, Light Luminaries, People Counters, Traffic Flow, etc. |
Number of Models and Devices |
|
Weather data, with forecast on week |
. |
|
Energy Monitoring: consumption, production, storage, etc. |
. |
|
OPC-UA, ModBus |
any complexity |
|
MQTT |
. |
|
Rest Call Services, collection |
any complexity |
|
POI collection. |
https://www.snap4city.org/731 |
|
GIS to data collection. |
https://www.snap4city.org/368 |
|
OSM to POI data collection. |
https://www.snap4city.org/175 |
|
Data Analytics: Customization, development, deploy |
|
|
Parking predictions |
Parking on silos Historical data needed, training, modeling, etc. |
|
Traffic Flow Reconstruction |
|
|
Traffic Flow predictions |
Historical data needed, training, modeling, etc.https://www.snap4city.org/download/video/course/da/ |
|
NOX prediction GRAL |
|
|
AQI or EAQI computing |
|
|
Heatmap production |
Metro area, > 10 sensors data https://www.snap4city.org/download/video/course/da/ |
|
OD matrix production |
|
|
Landslides prediction |
Metro area, provided that data are accessible https://www.snap4city.org/download/video/course/da/ |
|
Long Term NO2 predictions |
City area, provided that data are accessible https://www.snap4city.org/download/video/course/da/ |
|
Computing 15 Min City Index |
Metro area, provided that data are accessible https://www.snap4city.org/download/video/course/da/ |
|
Waste Collection Routing planning |
|
|
Wi-Fi Data Prediction |
Historical data needed, training, modeling, etc. https://www.snap4city.org/download/video/course/da/ |
|
People Flow Prediction |
Historical data needed, training, modeling, etc. https://www.snap4city.org/download/video/course/da/ |
|
People Counting Thermal |
Historical data needed, training, modeling, etc. https://www.snap4city.org/download/video/course/da/ |
|
3D Digital Twin City |
|
|
3D Digital Twin BIM level |
|
| For any other Data Analytics | please ask to Snap4City |
|
Dashboard: development, deploy |
Details |
|
Passive Dashboard Design and production |
|
|
Action Dashboard Design and production |
|
|
Smart Application, Design, Dashboard Javascript |
|
|
Services |
Details |
|
Data Source Analysis |
Doc |
|
Smart City Service Application Design |
Doc |
|
Mobile App Design |
Doc |
|
Smart City Strategy |
Doc |
|
Control Room Design |
Doc |
|
Platform Management: user, control, etc. |
Operative manager |
|
Workflow on OpenMain Design and production |
|
|
Applications: development, deploy |
Details |
|
1 Data Set Acquisition, 1 Dedicated Passive Dashboard for Monitoring |
for example an area, 1000 Devices of the same Model, taken from Rest Call, every 10 Minutes |
|
|
|
HOW TO: configure/install StartSNAP4CITYVM and dockers: starting appliance of Snap4City and the VM appliance Snap4CityMAIN includes tools
https://www.snap4city.org/drupal/node/487
The Configuration Models are:
- Micro X: configurations suitable for solutions for small verticals and industries, single VM, see in the following for the details.
- it is more complete than the Alone configuration of https://www.snap4city.org/471
- Micro1 can sustain:
- up to 8400 Entity Messages with 10 variables, plus GPS, etc., per minute on Orion Broker, in authenticated/Authorized manner
- up to 5000 complex geo-requests at the same time on Smart City API per minute, in authenticated/authorized manner
- up to 10000 new Entity Instances registrations with 5 variables per hour
- please ask to get more detailed benchmarks
- performances can be increased passing to other configurations and thus scaling with the number of brokers, NIFI cluster, OpenSearch Cluster, and balanced front-end for SmartCity API, balanced front-end for the Dashboards.
- VM main for the Micro1 with the above performance as:
- 24-32 Gbyte of RAM, 300-500 Gbyte of HD (this depends on data size you would like to have, we suggest 500 GByte in thin provisioning), and 16 cores or virtual cores, at 2.1GHz each.
- larger sizes may depend on the number of messages you are going to have in inputs, number of requestes on Smart City API (dashboards, mobile apps, etc.) and on the storage of your historical data, etc.
- see for passwords: https://www.snap4city.org/487
- Estimated Time to install: 3 hours (Micro 3), time estimated when the VM area ready, the Domain is known, the mailing server is known, and the rest is of default.
- Estimated Time to test and validate: 1 day (Micro 3)
- Normal X,Y: configurations with multple IoT App and Multiple IoT Brokers. They are on 2 VM, the first VM contains almost all, while the second only the Brokers and IoT Apps
- it is more complete than the Basic configuration of https://www.snap4city.org/471
- identical on Micro X but with distribution on 2 VM
- including Heatmap Manager, Traffic Flow Manager, ColorMap Manager, GeoServer
- Including iot-fiware-harvester that is the tool for integrating and managing the FIWARE Smart Data Models, the full collection of smart data model is ingested and become usable for the iot data modeling and management
- VM1 MAIN: contains the main as Dashboards services, Knowlege Base, Resource Manager, Authentication and authorization, Synoptics, WSserver, etc.
- 24-32 Gbyte of RAM, 300-500 Gbyte of HD (this depends on data size you would like to have, we suggest 500 GByte in thin provisioning), and 16 cores or virtual cores, at 2.1GHz each.
- larger sizes may depend on the number of users/data you have
- see for passwords: https://www.snap4city.org/487
- VM2 IOT Apps and Brokers: X IoT Apps, Node-RED, MicroServices; and Y IoT Brokers.
- 24-32 Gbyte of RAM, 300-500 Gbyte of HD (this depends on data size you would like to have, we suggest 500 GByte in thin provisioning), and 16 cores or virtual cores, at 2.1GHz each.
- The memory size depends on the number of IOT App you request. Each IOT App takes about 140Mbyte and 10% of a core, in a VM of 24Gbyte, 6 Cores you can have 70 IoT Apps, 100 Gbytes Storage in thin provisioning
- an IoT Orion Broker can work with 6 Gbyte Ram, 2 Cores, 50 Gbytes.
- presently there is limitation at 50 IOT App and 2 Brokers but this limitation can be removed having more resources.
- If more IOT App and Brokers are needed we suggest to clone di VM2 and change the configurations!!
- Estimated Time to install: 6 hours (Normal 10,2), time estimated when the VM area ready, the Domain is known, the mailing server is known, and the rest is of default.
- Estimated Time to test and validate: 1.5 day (Normal 10,2)
- Small X,Y: configurations with multple IoT App and multiple IoT Brokers. It is suitable for solutions in which the storage is growing and thus can be managed into a separate VM, and may be clustered later on.
They are on 4 VM- identical on Micro X but with distribution on 4 VM
- including Heatmap Manager, Traffic Flow Manager, ColorMap Manager, GeoServer
- Including iot-fiware-harvester that is the tool for integrating and managing the FIWARE Smart Data Models, the full collection of smart data model is ingested and become usable for the iot data modeling and management
- VM1 MAIN: contains the main as Dashboards services, Knowlege Base, Resource Manager, Synoptics, WS, etc.
- 24-32 Gbyte of RAM, 300-500 Gbyte of HD (this depends on data size you would like to have, we suggest 500 GByte in thin provisioning), and 16 cores or virtual cores, at 2.1GHz each.
- larger sizes may depend on the number of users you have
- see for passwords: https://www.snap4city.org/487
- VM2: authentication and authorisation: LDAP, KeyCloak, ....
- 10-16 Gbyte of RAM, more than 50-100 Gbyte of HD and 8 cores or virtual cores, faster than 2000GHz.
- VM3 STORAGE: NIFI, Open Distro for Elastic Sarch/Kibana,
- 24-32 Gbyte of RAM, more than 200-500 Gbyte of HD (this depends on data size you would like to have, we suggest 500-1000 GByte in thin provisioning), and 8 cores or virtual cores, faster than 2GHz each.
- larger sizes may depend on the number of data you have, please note that you can replicate and cluster them later
- VM4 IOT APPs and Brokers: X IoT Apps, Node-RED, MicroServices; and Y IoT Brokers.
- 24-32 Gbyte of RAM, 300-500 Gbyte of HD (this depends on data size you would like to have, we suggest 500 GByte in thin provisioning), and 16 cores or virtual cores, at 2.1GHz each.
- he memory size depends on the number of IOT App you request. Each IOT App takes about 140Mbyte and 10% of a core, in a VM of 24Gbyte, 6 Cores you can have 70 IoT Apps, 100 Gbytes Storage in thin provisioning
- an IoT Orion Broker can work with 6 Gbyte Ram, 2 Cores, 50 Gbytes.
- Estimated Time to install: 16 hours (Small 10,2), time estimated when the VM area ready, the Domain is known, the mailing server is known, and the rest is of default.
- Estimated Time to test and validate: 3 days (Small 10,2)
- identical on Micro X but with distribution on 4 VM
- DataCitySmall X,Y,Z: configurations with multple IoT App, multiple IoT Brokers, and multiple KB/ServiceMap. It is suitable for more scalable solutions in which the storage is growing and thus can be managed into a separate VM, also IoT App can be managed separately, such as also the IoT Brokers. It is the perfect starting point for replicating VM for storage, Brokers and IoT according to the needs, and thus for supporting MultiTenant solutions.
They are on 6 VM- VM1 MAIN: contains the main as Dashboards services, Resource Manager, Synoptics, WS, etc.
- 24-32 Gbyte of RAM, 300-500 Gbyte of HD (this depends on data size you would like to have, we suggest 500 GByte in thin provisioning), and 16 cores or virtual cores, at 2.1GHz each.
- larger sizes may depend on the number of users you have
- see for passwords: https://www.snap4city.org/487
- VM2: authentication and authorisation: LDAP, KeyCloak, ....
- 10-16 Gbyte of RAM, more than 50-100 Gbyte of HD and 8 cores or virtual cores, faster than 2000GHz.
- VM3 STORAGE: NIFI, Open Distro for Elastic Sarch/Kibana,
- 24-32 Gbyte of RAM, 300-500 Gbyte of HD (this depends on data size you would like to have, we suggest 500 GByte in thin provisioning), and 16 cores or virtual cores, at 2.1GHz each.
- larger sizes may depend on the number of data you have, please note that you can replicate and cluster them later
- VM4 IOT APPs: X IoT Apps, Node-RED, MicroServices.
- 24-32 Gbyte of RAM, 300-500 Gbyte of HD (this depends on data size you would like to have, we suggest 500 GByte in thin provisioning), and 16 cores or virtual cores, at 2.1GHz each.
- The memory size depends on the number of IOT App you request. Each IOT App takes about 140Mbyte and 10% of a core, in a VM of 24Gbyte, 6 Cores you can have 70 IoT Apps, 100 Gbytes Storage in thin provisioning
- VM5 IOT BROKERS: Y IoT Brokers, secure filter, etc.
- 8-12 Gbyte of RAM, more than 100 Gbyte of HD (this depends on data size you would like to have, we suggest 100-200 GByte in thin provisioning), and 8 cores or virtual cores, faster than 2GHz each.
- please note that each IoT Orion Broker can work with 6 Gbyte Ram, 2-4 Cores, 50 Gbytes of storage.
- VM6 Knowledge Bases: Z KB, ServiceMap, one for each organization, they can be federated each other.
- Estimated Time to install: 3 days (DataCitySmall 10,2,2), time estimated when the VM area ready, the Domain is known, the mailing server is known, and the rest is of default.
- Estimated Time to test and validate: 5 days (DataCitySmall 10,2,2)
- VM1 MAIN: contains the main as Dashboards services, Resource Manager, Synoptics, WS, etc.
- DataCityMedium X, Y, Z, W: is a mid range solution for medium size cities, with
- VM1 MAIN: contains the main as Dashboards services, Resource Manager, Synoptics, WS, etc.
- 24-32 Gbyte of RAM, 300-500 Gbyte of HD (this depends on data size you would like to have, we suggest 500 GByte in thin provisioning), and 16 cores or virtual cores, at 2.1GHz each.
- larger sizes may depend on the number of users you have
- see for passwords: https://www.snap4city.org/487
- VM2: authentication and authorisation: LDAP, KeyCloak, ....
- 10-16 Gbyte of RAM, more than 50-100 Gbyte of HD and 8 cores or virtual cores, faster than 2000GHz.
- STORAGE a number of VM in cluster for managing: NIFI, Open Distro for Elastic Sarch/Kibana, each of them
- 24-32 Gbyte of RAM, 300-500 Gbyte of HD (this depends on data size you would like to have, we suggest 500 GByte in thin provisioning), and 16 cores or virtual cores, at 2.1GHz each.
- larger sizes may depend on the number of data you have, please note that you can replicate and cluster them later
- Since each VM is 500Gbyte, the number of VM depends on the volume of your storage and of the redundancy you need.
- IOT APPs: a number of VM in cluster for managing a large number of IoT Apps, Node-RED, MicroServices, each of them, in the ange of 70-100 for each VM
- 24-32 Gbyte of RAM, 300-500 Gbyte of HD (this depends on data size you would like to have, we suggest 500 GByte in thin provisioning), and 16 cores or virtual cores, at 2.1GHz each.
- The memory size depends on the number of IOT App you request. Each IOT App takes about 140Mbyte and 10% of a core, in a VM of 24Gbyte, 6 Cores you can have 70 IoT Apps, 100 Gbytes Storage in thin provisioning
- a number of VM for managing IoT Brokers, secure filter, etc., each of them
- 8-12-18 Gbyte of RAM, more than 100 Gbyte of HD (this depends on data size you would like to have, we suggest 100-200 GByte in thin provisioning), and 8 cores or virtual cores, faster than 2GHz each.
- please note that each IoT Orion Broker can work with 6 Gbyte Ram, 2-4 Cores, 50 Gbytes of storage.
- typically 2/3 Brokers for each VM
- a number of VM for managing Federated Organizations each of which with KB, ServiceMap, each of them
- 24-32 Gbyte of RAM, 300-500 Gbyte of HD (this depends on data size you would like to have, we suggest 500 GByte in thin provisioning), and 16 cores or virtual cores, at 2.1GHz each.
- larger sizes may depend on the number of data you have, please note that you can replicate and federate later
- typically 1-2 KB for each VM.
- another VM for the Heatmap Manager, Traffic Flow Manager, GeoServer, etc.
- other VM for other services.....
- VM1 MAIN: contains the main as Dashboards services, Resource Manager, Synoptics, WS, etc.
- DataCityLarge
- https://www.snap4city.org/471
- it is an almost cusstom installation which usually start from one of the above, please ask.
If you have problems with some configuration produced you have to contact us by providing the configuration TOKEN you could get at the end of the generation of the configuration files.
PLEASE NOTE THAT
In the form for producing the configuration we are not asking you the email and password for configuring the system for sending emails, etc., and usualy notifications are sent by email by the solutions.
So that in all the configuration in the VM1 you can open the file and write there your: SMTP server, your email account for the server, the corresponding password, and the sender name all personal information, that we avoid to request you to respect your privacy. Once you have performed the genration of configuration files, they can be downloaded as ZIP file in which you can find a folder for each VM (named as the provided IP, that is the IPVM). The files in which you can set that information are:
- IPVM1\dashboard-backend-conf\config.properties
- IPVM1\dashboard-builder-conf\mailServer.ini
- IPVM1\notificator-conf\conf.ini
- IPVM1\servicemap-conf\servicemap.properties
Micro X configurations
Micro X: for example you can realize Micro 3, Micro 1 configurations as explained in the following
-
The Micro X configurations are suitble for solutions for small verticals and industries.
- X represents the number of IoT Applications that will be available after the intallation
- the X # of IoT-Apps is the first information requested
- The Micro X includes all tools into a single VM so that before starting you have to provide the IP of the VM in which Dockers will have to be installed
- the IP is the second information requested by the tool to you
- Click on "Fill Placeholders" will allow you to provide the information needed to finalize the generation of the Docker compose files
- the placeholders are divided into two categories:
- mandatory to be provided: that are those that you have to provide to complete the installation
- Default Fields: which can be changed if needed by selecting "Show default Fields"
- The Mandatory fields are, for example:
-
- "dashboard", "www.smartcitysnap.org", etc.
- in the following example is used "dashboard"
- SEE ABOVE TO GET WHERE THE smntp information can be imposed.
- Geo Location, GPS on map or values to be provided, of the unique IoT Orion Broker Fiware created in the solution
- please note that the Password for posting email is not requested so that you have to fill it into ..........
-
- After setting the Mandatory fields, You can SAVE Configuration and a TOKEN is provided to reload the configuration and create a new one, or get again the file for deploy
- At the same time a button for Download Configuration is activated. The ZIP file provided includes a subdirectory for each VM with the IP value, 1 VM in this case and thus one IP.
- For example a VM Micro-2 contains:
- IoT layer
- Orion Broker and Orion Broker Filter for access control, and its Mongo
- IoT Directory
- IOT App, Processing layer
- Two IoT Applications: 001, and 002
- Visualization layer: Dashboards and events
- Dashboard Builder: dashboard, dashboard back end, cron processes
- database MySQL for configurations
- Notificator for stand alone solutions
- Synoptic and WS, WebSockets related staff
- Dashboard Builder: dashboard, dashboard back end, cron processes
- Storage layer:
- NIFI, Open Search (ex Open Distro for Elastic Search / Kibana), ZooKeeper
- Personal data with MyKPI
- ServiceMap, knowledge base, Smart City API, Super Smart City API, WS and Kafka, and Virtuoso RDF store
- Management Services
- Resource Manager, that is named as Process Loader: data dictionary
- LDAP (for the user role management)
- Ownership manager: according to GDPR
- KeyCloak for the Authetication Management
- IoT layer
- the placeholders are divided into two categories:
- DEPLOY: To execute the installation/configuration you need to have a VM (for example wth Debian) with Docker and Docker-Compose installed.
- verify that your Docker and Docker-Compose are operative and well installed
- Unapack the ZIP file in a directory. Move into the directory of the VM IP with command CD <IP>. There there a number of files that are going to be used in the successive steps, such as
- docker-compose.yml
- apache-proxy.conf
- post-setup.sh
- setup.sh
- Thus you can execute the installation by executing the command:
- setup directories write permissions and sets vm.max_map_count=262144 for elasticsearch consider adding this option into /etc/sysctl.conf otherwise have to be set after each reboot (please neglect eventual NON docker errors, the solution tries to create directories in multiple places)
- sudo ./setup.sh
- deploy the containers, or to put them in execution if they have been aready installed
- sudo docker-compose up
- to perform a detached process: "docker-compose up -d"
- sudo docker-compose up
- setup virtuoso and elasticsearch (to be done only the first time but no problem if you repeat) (please neglect eventual NON docker errors, the solution tries to create directories in multiple places, give time to complete at the last command)
- sudo ./post-setup.sh
- please note that the above commands have to be executed at each boot of the system / VM.
- setup directories write permissions and sets vm.max_map_count=262144 for elasticsearch consider adding this option into /etc/sysctl.conf otherwise have to be set after each reboot (please neglect eventual NON docker errors, the solution tries to create directories in multiple places)
- VERIFY: The process downloads from internet all the docker images needed and deploy/configuration the whole entities and finally putting in execution all containers, for example resulting in 10 minutes the following log on your terminal:
- Creating 192168125_nifi_1 ... done
Creating 192168125_elasticsearch_1 ... done
Creating 192168125_dashboard-cron_1 ... done
Creating 192168125_kibana_1 ... done
Creating 192168125_iotapp-001_1 ... done
Creating 192168125_dashboarddb_1 ... done
Creating 192168125_synoptics_1 ... done
Creating 192168125_zookeeper_1 ... done
Creating 192168125_virtuoso-kb_1 ... done
Creating 192168125_iotapp-002_1 ... done
Creating 192168125_mongo-001_1 ... done
Creating 192168125_iotapp-003_1 ... done
Creating 192168125_ldap-server_1 ... done
Creating 192168125_proxy_1 ... done
Creating 192168125_dashboard-backend_1 ... done
Creating 192168125_orion-001_1 ... done
Creating 192168125_servicemap_1 ... done
Creating 192168125_kafka_1 ... done
Creating 192168125_keycloak_1 ... done
Creating 192168125_myldap_1 ... done
Creating 192168125_orionbrokerfilter-001_1 ... done
Creating 192168125_wsserver_1 ... done
Creating 192168125_personaldata_1 ... done
Creating 192168125_dashboard-builder_1 ... done - the first time can be useful to put in exceution in that manner to see all the progress, while the successive execution could be performed in background by using the "-d" option for detached.
- Creating 192168125_nifi_1 ... done
- with command "sudo docker container ls" is possible to get the list of containers in execution on your VM. When they are you can something similarly to
- 400d37ccb85a disitlab/personaldata:v2 "catalina.sh run" 2 minutes ago Up 2 minutes 0.0.0.0:8080->8080/tcp, :::8080->8080/tcp 192168125_personaldata_1
a31860d39e2e disitlab/dashboard-builder:v5 "docker-php-entrypoi…" 2 minutes ago Up 2 minutes 0.0.0.0:70->80/tcp, :::70->80/tcp 192168125_dashboard-builder_1
cbeae5e8d703 disitlab/websocketserver:v2 "/bin/sh -c 'sh -c \"…" 2 minutes ago Up 2 minutes 0.0.0.0:9000->9000/tcp, :::9000->9000/tcp 192168125_wsserver_1
82bc327fa61e disitlab/orionbrokerfilter:v3 "catalina.sh run" 2 minutes ago Up 2 minutes 8080/tcp, 0.0.0.0:8443->8443/tcp, :::8443->8443/tcp 192168125_orionbrokerfilter-001_1
88cda8f44f64 disitlab/preconf-keycloak:v4 "/opt/jboss/tools/do…" 2 minutes ago Up 2 minutes 8080/tcp, 0.0.0.0:8088->8088/tcp, :::8088->8088/tcp 192168125_keycloak_1
38ee6e7bb14a osixia/phpldapadmin "/container/tool/run" 2 minutes ago Up 2 minutes 80/tcp, 0.0.0.0:6443->443/tcp, :::6443->443/tcp 192168125_myldap_1
3788cda8ba08 bitnami/kafka:latest "/opt/bitnami/script…" 2 minutes ago Up 2 minutes 0.0.0.0:9092-9093->9092-9093/tcp, :::9092-9093->9092-9093/tcp 192168125_kafka_1
45a479936ae8 disitlab/servicemap:v1 "catalina.sh run" 2 minutes ago Up 2 minutes 0.0.0.0:8090->8080/tcp, :::8090->8080/tcp 192168125_servicemap_1
0a6e7c767a0a fiware/orion "/usr/bin/contextBro…" 2 minutes ago Up 2 minutes 0.0.0.0:1026->1026/tcp, :::1026->1026/tcp 192168125_orion-001_1
f86f355af8e6 disitlab/dashboard-backend:v0 "/bin/sh -c ./run.sh" 2 minutes ago Up 2 minutes 192168125_dashboard-backend_1
8ece26409bb8 mongo:3.6 "docker-entrypoint.s…" 2 minutes ago Up 2 minutes 27017/tcp 192168125_mongo-001_1
dc5d03dd2b2e nginx "/docker-entrypoint.…" 2 minutes ago Up 2 minutes 0.0.0.0:80->80/tcp, :::80->80/tcp 192168125_proxy_1
5620a1069817 disitlab/snap4city-nodered-v1.1.3-adv:v21 "npm start -- --user…" 2 minutes ago Up 2 minutes 0.0.0.0:1882->1880/tcp, :::1882->1880/tcp 192168125_iotapp-003_1
fd72bb4aa238 tenforce/virtuoso:1.3.1-virtuoso7.2.1 "/bin/bash /virtuoso…" 2 minutes ago Up 2 minutes 0.0.0.0:1111->1111/tcp, :::1111->1111/tcp, 0.0.0.0:8890->8890/tcp, :::8890->8890/tcp 192168125_virtuoso-kb_1
f6a20255b785 zookeeper "/docker-entrypoint.…" 2 minutes ago Up 2 minutes 2888/tcp, 3888/tcp, 0.0.0.0:2181->2181/tcp, :::2181->2181/tcp, 8080/tcp 192168125_zookeeper_1
6318892a87fb disitlab/preconf-openldap:v2 "/container/tool/run…" 2 minutes ago Up 2 minutes 0.0.0.0:389->389/tcp, :::389->389/tcp, 0.0.0.0:636->636/tcp, :::636->636/tcp 192168125_ldap-server_1
ac1514569e25 disitlab/snap4city-nodered-v1.1.3-adv:v21 "npm start -- --user…" 2 minutes ago Up 2 minutes 0.0.0.0:1881->1880/tcp, :::1881->1880/tcp 192168125_iotapp-002_1
84b4f4427765 disitlab/synoptics:v0 "docker-entrypoint.s…" 2 minutes ago Up 2 minutes 0.0.0.0:3001-3002->3001-3002/tcp, :::3001-3002->3001-3002/tcp 192168125_synoptics_1
c3760ddec79d mariadb "docker-entrypoint.s…" 2 minutes ago Up 2 minutes 0.0.0.0:3306->3306/tcp, :::3306->3306/tcp 192168125_dashboarddb_1
6e05d5d776b7 kibana:6.8.5 "/usr/local/bin/kiba…" 2 minutes ago Up 2 minutes 0.0.0.0:5601->5601/tcp, :::5601->5601/tcp 192168125_kibana_1
c003cf40be0f elasticsearch:6.8.5 "/usr/local/bin/dock…" 2 minutes ago Up 2 minutes 0.0.0.0:9200->9200/tcp, :::9200->9200/tcp, 9300/tcp 192168125_elasticsearch_1
ab3490775ef1 disitlab/dashboard-builder:v4 "docker-php-entrypoi…" 2 minutes ago Up 2 minutes 80/tcp 192168125_dashboard-cron_1
16b397fa5dbb apache/nifi:1.9.2 "../scripts/start.sh" 2 minutes ago Up 2 minutes 8080/tcp, 0.0.0.0:1030->1030/tcp, :::1030->1030/tcp, 8443/tcp, 0.0.0.0:9090->9090/tcp, :::9090->9090/tcp, 10000/tcp 192168125_nifi_1
9c53e870f480 disitlab/snap4city-nodered-v1.1.3-adv:v21 "npm start -- --user…" 2 minutes ago Up 2 minutes 0.0.0.0:1880->1880/tcp, :::1880->1880/tcp 192168125_iotapp-001_1
CONTAINER ID IMAGE COMMAND CREATED STATUS PORTS NAMES - the resulting services will be at the following port on the main <IP>, for a schema see https://www.snap4city.org/docker-generator/micro_components_x
- virtuoso: 8890, 1111
- Servicemap: 8890, 8880
- kafka: 9092, 9093
- zookeeper: 2181
- dashboard back end:
- dahboard front end: 80
- database mysql: 3306
- wsserver: 9000
- ldap server 389, 636
- nodered application 1, node-red editing 1880
- nodered application 2, node.red editing 1881
- orion broker. 1026:1026
- Mongo on orion broker: 27017
- elastic search: 9200
- kibana 5601
- nifi: 9090
- personaldata service: 8080
- keycloak 8088
- synoptics: 3000, 3001
- orionbrokerfilter 8443
- phpldapadmin 6443, 443
- 400d37ccb85a disitlab/personaldata:v2 "catalina.sh run" 2 minutes ago Up 2 minutes 0.0.0.0:8080->8080/tcp, :::8080->8080/tcp 192168125_personaldata_1
- OPEN the Interface You can test the correct installation from another computer in the same network. This computer has to present in its etc/hosts file the statement
- "<IP> dashboard" with <IP> the IP that you geve at the VM
- in our example has been "192.168.1.25 dashboard" if
-
- so that you can execute from a browser of that PC:
- http:///dashboardSmartCity/
- you can use the default username and password also used in MAINVM: https://www.snap4city.org/487
- username: usermanager (lower level) password: 5AwJZkp (Manager)
- username: userareamanager password: Mdn!hkH (AreaManager)
- username: usertooladmin password: $vVP8sQ (ToolAdmin)
- username: userrootadmin (top level) password: Sl9.wrE@k (RootAdmin)
- Please use the RootAdmin Role only for admin and not for development
- The best user Role for development of Devices, Models, Dashboard, data, and solution is the AreaManager
- Other services can be verified to be ccording to the apache-proxy.conf file
- if
- http://dashboard/ServiceMap/api/v1/iot/ -> http://servicemap:8080/iot/
- http://dashboard/ServiceMap/ -> http://servicemap:8080/ServiceMap/
- http://dashboard/wsserver -> http://wsserver/wsserver
- http://dashboard/superservicemap/ -> http://servicemap:8080/superservicemap/rest/
- http://dashboard/auth/ -> http://keycloak:8088/auth/
- http://dashboard/datamanager/ -> http://personaldata:8080/datamanager/
- http://dashboard/kibana/ -> http://kibana:5601/kibana/
- http://dashboard/synoptics/ -> http://synoptics:3002/
- http://dashboard/synoptics/socket.io/ -> https://synoptics:3001/socket.io/
- http://dashboard/ -> http://dashboard-builder/
- http://dashboard/iotapp/iotapp-001/ -> http://iotapp-001:1880/iotapp/iotapp-001/
- http://dashboard/iotapp/iotapp-002/ -> http://iotapp-002:1881/iotapp/iotapp-002/
- if
- to administrate the ldap server use https://myldap:6443/phpldapadmin and login with
- user: cn=admin,dc=ldap,dc=organization,dc=com
- password: secret
- to administrate the keycloak server use http://dashboard/auth/admin if and login with
- user: admin
- password: admin
- the Broker(s) starts private and has to be made visible by delegation/publication to other users. It can be done from RootAdmin Role user
- Please enter in edit of the broker and save to become the owner of the IOT Broker listed
- then by using button "myownprivate" and make delegate to the "Organization" for making it acessible to other users of the whole installation since their belog all to the same Org named "Organization!
- Thus, the AreaManager can create an IoT Device Model, that is the first step to crete an IoT Device. What you create the IoT Device Model, take care to add in the Variable one for the enebling the time series that has to be called conventiaionally "dateObserved" as Time, Timestamp, TimeStamp in milliseconds.
- from the IOT App you can send a real time messages to a new dashboard you can create, for testing WS
- from the IOT App you can send data to the IoT Device, but you have to create the IoT device before
- from the Dashboard you can send event driven data on the Dashboards, etc.
- We suggest you to follow the tutorials on Https://www.snap4city.org/577
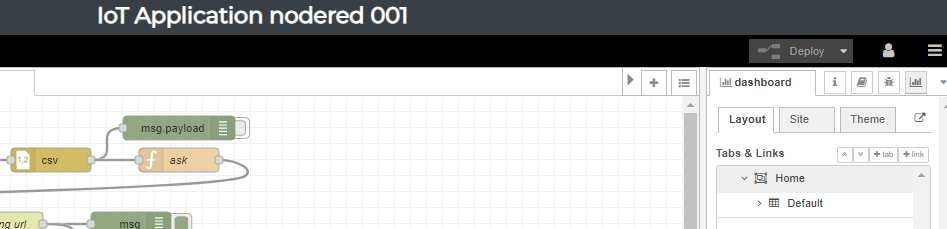
- Monitoring the whole DEPLOY status
- for monitoring the status of the full set of dockers and modules in the distribution you can access to the NODE-RED dashboard of IOT App 001. The dashboard can be accessed by using http://<----installation name--->/iotapp/iotapp-001/ui/#!/0?socketid=eizXguXlpovDQvhJAAAA Please note that the socketid is different from an installaton to another. So that you need to access at the dashboard from inside the IOT App/Node-RED by clicking on the micro button with the arrow in a square [ ] on the right upper corner of the user interface, and selecting dashboard of node-red
- In the following figure you can see the typical status of the dashboard
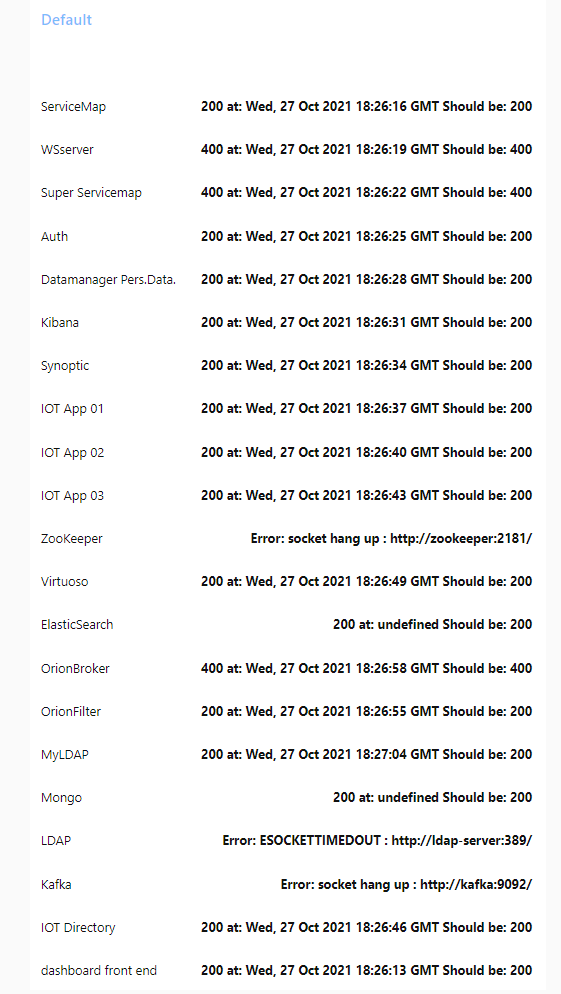
- please note that services with HTTP have a different response with respect to those that do not provide. but the above status is the regular one, at least in terms of docker executed correctly.
- that is: LDAP, KAFKA and ZOOKEEPER are reported at the bottom since they have different tytical response
- please note that the code for this IOT App is included into your IoT App 001, when you perform the installation is there, as flow 2, since version of November 2021
- please note that if the above dashboard does not report any status probably you have to start the process of test by cliking on the inject node of the flow. You can change the node inject config making it periodic, for instance 10 minutes
- GO DOWN: suggested way to shutdown, including the cleaning of the databases with option -v, whick cleans the volumes
- sudo docket-compose down
- sudo docker-compose down -v
- CLEAN an Installation, including the cleaning of the databases
- sudo docker-compose down -v
- sudo docker kill $(docker ps -q)
- Shutdown the MICROX and other configurations in the main VM
- use "docker-compose stop" before shutting down of the VM, this should avoid the automatic restart at boot and use "docker-compose start" to boot.
- If the down is too rapid and not respectfully some file remain pending, than execute:
- docker-compose exec dashboard-cron rm /var/www/html/dashboardSmartCity/ScheduledTasks/running*.txt
- to remove any pending running file
- after a while you can also do
- docker-compose restart orionbrokerfilter-001 personaldata servicemap
- to restart the services that could have problems when started when keycloak was not running in case you have connection problems with nginx try
- docker-compose restart proxy
- there could be a problem with orion borker that keeps restarting (it leaves a .pid file that prevents it from starting) in this case you can do
- docker-compose stop orion-001
- docker-compose rm orion-001
- docker-compose up -d orion-001
- Security:
- please note that all the system is installed/configures without any security and firewall in front included in the compose. So that it is supposed that you are going to install the solution/microx behind a firewall opening only the ip and ports for smart city API, that is the 80. This is obvious also to have a FW in the front when multiple VM are used in the other models.
- Troubleshooting:
- MicroX troubleshooting ENG: https://www.snap4city.org/download/video/TroubleShooting-MicroX-on-premise-en.pdf
- MicroX troubleshooting ITA: https://www.snap4city.org/download/video/TroubleShooting-MicroX-on-premise.pdf
- if the ServiceMap is not visible please executer the sudo ./post-setup.sh
- if the WS connecting dashboard widgets int othe IoT with Dashboards, please restart the WSserver docker
- for the commands please go in the directory in which you have placed the docker-compose.yml file
- to see the status of the process: "sudo docker-compose ps"
- Sometimes the Dockers does not start in the right sequence since one could be slower. This is going to be solved in the next version. So that, you may need to restart the specific container if some of the above services/modules/containers are not started. For the restart you can use also the nick names of the services/container (or the ID) as the in the following example. The name of the modules are
- nifi, elasticsearch, dashboard-cron, kibana, dashboarddb, synoptics, zookeeper, kafka, keycloak, myldap, wsserver, personaldata, dashboard-builder, ldap-server, proxy, dashboard-backend,
- for IOTAPPS X: iotapp-001, iotapp-002, ................
- for BROKERS Y: mongo-001, orion-001, orionbrokerfilter-001, ...........
- for KBs Z: servicemap, virtuoso-kb, .....................
- The WS container as other may need to be restarted, if they fail at boot for example. In those cases you can
- identify them by listing containers using "sudo docker container ls", get the Container ID
- restart a container "sudo docker restart <container ID>"
- After a restart of the container you probably need to restart also the Proxy that need to register the local nick name.
- sudo docker restart proxy
- in some cases if you have problems with Data Inspector, you can kill the cron process and restart
- please note that only IoT devices which are public are visible on Knowledge Base, ServiceMap.
- Please any IoT Device you create can be accessed on IoT Directory in which you can create a message to be sent at the IoT Device, the data will be immediatly ent to the broker and you can read them from the same user interface of the IoT Directory.
- please follow the steps for testing on training pages https://www.snap4city.org/577
- if you need to change the certificate for TSL connections, HTTPS, etc. you can act on file:
- nginx-proxy-conf/nginx.conf
- follow this guide: https://pentacent.medium.com/nginx-and-lets-encrypt-with-docker-in-less-than-5-minutes-b4b8a60d3a71
it needs to be adapted to our containers name (proxy rather than nginx etc etc). To get more search "letsencrypt nginx docker" with google you can find many other examples. -
to pass at HTTPS in the docker compose search by using grep https://<youdomain> *
or do: grep https://<youdomain> *-conf/* docker-compose.yml iotapp*/*.js
to see all confg files whare the http has to be replaced with https. You can use "sed" to automate this task. Please perform a back up.
after changing the files you should do: docker-compose up -d
to recreate the modified containers and restart the containers doing: docker-compose restart servicemap synoptics wsserver iotapp-001 (add all iotapps you have)
- ....
- "<IP> dashboard" with <IP> the IP that you geve at the VM
- GET MORE: See https://github.com/disit/snap4city-docker/blob/master/DataCity-Small/README.md for
Normal X,Y configurations:
- it is more complete than the Basic configuration of https://www.snap4city.org/471
- it is based on two VMs see the MICRO X Config. one for the MAIN and the second for the scaling of IOT APP and Orion Brokers.
- identical on Micro X but with distribution on 2 VM, see above for detailed instructions
- WE SUGGEST:
- read carefully the MICRO X configuration since almost all steps are very similar and they are NOT repeated here-
- the main difference is the fact that Two IPs are requested and the allocations of module is performed as above described.
- DEPLOY: To execute the installation/configuration you need to have a VM (for example wth Debian) with Docker and Docker-Compose installed.
- verify that your Docker and Docker-Compose are operative and well installed
- Unapack the ZIP file in a directory. Move into the directory of the VM IP with command CD <IP>. There there a number of files that are going to be used in the successive steps, such as
- docker-compose.yml, apache-proxy.conf, post-setup.sh, setup.sh
- IN VM1 you have to execute the installation by executing the commands (please neglect eventual NON docker errors, the solution tries to create directories in multiple places, AND give time to complete the work at the last command):
- verify the IP of the VM. It has to be the one of the configuration and the network has to reacheable
- sudo ./setup.sh
- sudo docker-compose up -d
- sudo ./post-setup.sh
- please note that the above commands have to be executed at each boot of the system / VM.
- IN VM2 you have to execute the installation by executing the commands:
- verify the IP of the VM. It has to be the one of the configuration and the network has to reacheable
- sudo ./setup-iotapp.sh
- sudo docker-compose up -d
- the result for a NORMAL 2 2 would be similar to
- Creating normal26_iotapp-002_1 ... done
Creating normal26_mongo-001_1 ... done
Creating normal26_iotapp-001_1 ... done
Creating normal26_orion-002_1 ... done
Creating normal26_orion-001_1 ... done
Creating normal26_orionbrokerfilter-001_1 ... done
Creating normal26_orionbrokerfilter-002_1 ... done
Creating normal26_mongo-002_1 ... done
- please note that the above commands have to be executed at each boot of the system / VM.
- GET MORE: See https://github.com/disit/snap4city-docker/blob/master/DataCity-Small/README.md for
- VERIFY: The process downloads as in the MICRO X
- OPEN the Interface
- http:///dashboardSmartCity/
- enter with the credentials of MICRO X
- Go in the IoT App 01 to see the status of the solution as described in MICRO X
- OPEN the Interface
Small-X-Y configurations:
- it is based on two VMs see the MICRO X Config. one for the MAIN and the second for the scaling of IOT APP and Orion Brokers.
- identical on Micro X but with distribution on 4 VM, see above for detailed instructions
- Troubleshouting:
- installed the docker-compose.yml, from https://github.com/disit/
snap4city-docker/tree/master/ DataCity-Small , if you got the empty table regarding the FIWARE Models. -
This happens when starting all containers and the harvesting on github of fiware models starts before the db is completely setup.
However this harvesting is performed every hour so if you check now it should be ok.
Otherwise restart the container with:
docker-compose restart iot-fiware-harvester
and check the logs with:
docker-compose logs iot-fiware-harvester
- installed the docker-compose.yml, from https://github.com/disit/
DataCitySmall-X-Y-Z configurations:
- it is based on x VMs see the MICRO X Config. one for the MAIN and the second for the scaling of IOT APP and Orion Brokers.
- identical on Micro X but with distribution on x VM, see above for detailed instructions
DataCityMedium-X-Y-Z-W configurations:
- it is based on x VMs see the MICRO X Config. one for the MAIN and the second for the scaling of IOT APP and Orion Brokers.
- identical on Micro X but with distribution on x VM, see above for detailed instructions
DataCityLarge configurations:
- it is based on x VMs see the MICRO X Config. one for the MAIN and the second for the scaling of IOT APP and Orion Brokers.
- it is almot custom installation, please ask.
Error: __clone method called on non-object in og_user_access_entity() (line 2249 of /var/www/html/drupal/sites/default/modules/og/og.module).
Comments
Snap4City Install Bind for 0.0.0.0:3001 failed: port is already
aliferisi - Wed, 06/08/2022 - 10:21Running root@snap4city-swtd:~/172.30.1.243# docker compose up I get
Error response from daemon: driver failed programming external connectivity on endpoint 172301243-synoptics-1 (905884ff1c384c75857d0c7ea9d4562f5f2aaf462f757d053e5100b9d28cec4c): Bind for 0.0.0.0:3001 failed: port is already allocated
I see that both iot-directory-discover-api and synoptics:v1 publish the 3001 port.
I am attaching the parameters and docker compose file. Also note that this is a fresh Micro X install with docker compose files just created from https://www.snap4city.org/docker-generator/selecting_model
root@snap4city-swtd:~/172.30.1.243# grep -B 10 3001 docker-compose.yml
- ./mariadb-conf:/etc/mysql/mariadb.conf.d:rw
- dashboarddb:/var/lib/mysql:rw
iot-discovery:
image: disitlab/iot-directory-discover-api:v0
logging:
driver: json-file
options:
max-file: '10'
max-size: 100m
ports:
- published: 3001
target: 3001
--
max-size: 100m
ports:
- published: 8983
target: 8983
restart: unless-stopped
volumes:
- solr-data:/var/solr:rw
synoptics:
image: disitlab/synoptics:v1
ports:
- published: 3001
target: 3001
the issues has been solved with a direct call
roottooladmin1 - Mon, 06/20/2022 - 08:56the issues has been solved with a direct call
this is what
roottooladmin1 - Mon, 06/20/2022 - 08:58means that on your host machine port 3001 is already used for some other service/process
you can comment the lines that map this port on the host
normally is not needed
synoptics:
image: disitlab/synoptics:v1
# ports:
# - published: 3001
# target: 3001
# - published: 3002
# target: 3002
restart: always
volumes:
- ./synoptics-conf/config.js:/usr/src/synoptics/new-config.js:rw
- ./synoptics-conf/v2-config.js:/usr/src/synoptics/v2/new-config.js:rw